
Main Courses
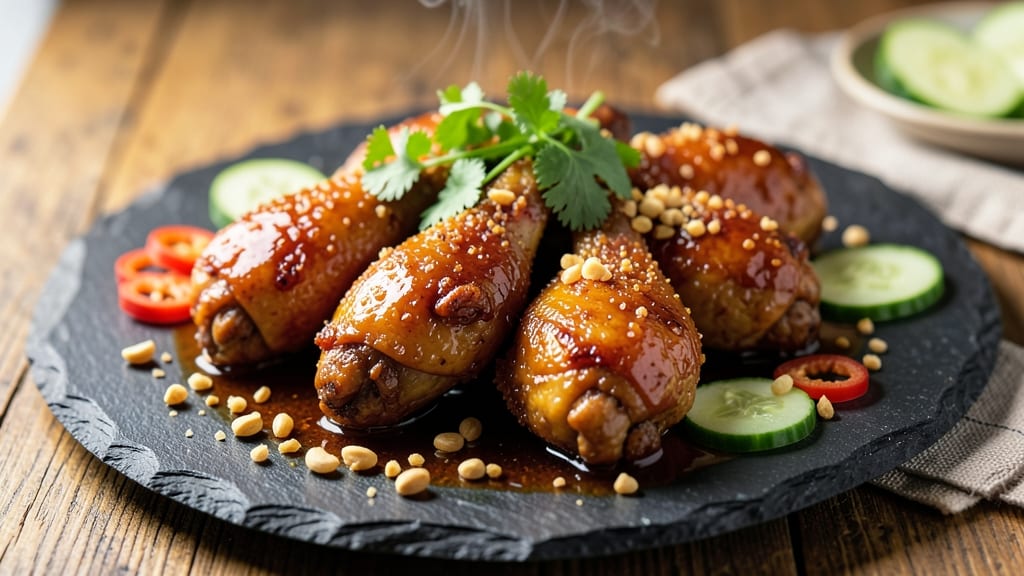
This Bangkok fried chicken recipe transforms ordinary fried chicken into a juicy, aromatic masterpiece where Thai flavors collide with crispy perfection. The secret lies in a marinade of lemongrass, galangal, and five-spice powder that infuses the chicken with bright, herbal notes before a double-fry creates that signature crunch.
I developed this recipe after years of experimenting with Thai street food techniques—what started as a weekend project became my go-to for dinner parties and late-night cravings.
The magic happens in layers: tender chicken thighs marinated overnight, then coated in a mix of rice flour and cornstarch for an extra-crispy exterior. A light glaze of coconut milk and palm sugar caramelizes during frying, adding a sticky-sweet contrast to the spicy-savory marinade.
What you'll end up with is golden-brown chicken that's juicy inside, crispy outside, and packed with complex flavors that transport you to Bangkok's bustling streets.
This recipe delivers restaurant-quality results without requiring specialized equipment—just a deep fryer or heavy pot, and patience for the double-frying step. The chicken stays tender because we work with thighs (never breasts), and the marinade ensures every bite is bursting with lemongrass and galangal.
Serve with a side of spicy Thai chili sauce and steamed jasmine rice to complete the experience.
The best part? The flavors only get better as the chicken sits—making it perfect for meal prep or feeding a crowd. Whether you're introducing someone to Thai cuisine or craving a familiar dish with a bold twist, this Bangkok fried chicken will become your new favorite.
Let's get cooking with this fusion recipe that proves fried chicken can be both comforting and exciting.
Ingredients for bangkok fried chicken
Six aromatic ingredients and one secret technique create this Bangkok-style fried chicken masterpiece.
| Ingredient | Amount | Notes |
|---|---|---|
| Chicken Thighs (bone-in, skin-on) 🍗 | 3 lb | Trim excess fat, even thickness |
| Fresh Lemongrass 🌿 | ½ cup | Bruised stalks, bottom 6 inches only |
| Galangal (Thai Ginger) 🧅 | ¼ cup | Fresh, peeled, thinly sliced |
| Five-Spice Powder 🌶️ | 2 tbsp | Store-bought or homemade blend |
| Fish Sauce 🍶 | 3 tbsp | Red Boat preferred for quality |
| Palm Sugar 🍯 | ¼ cup | Or light brown sugar substitute |
| Rice Flour 🌾 | 1 cup | For crispy exterior coating |
| Cornstarch 🌾 | ½ cup | Extra crunch factor |
| Coconut Milk (full-fat) 🥥 | ½ cup | For glaze, canned preferred |
| Vegetable Oil (for frying) 🫒 | 4 cups | Peanut or canola works best |
| Kosher Salt 🧂 | 1 ½ tbsp | Diamond Crystal preferred |
| Black Pepper 🌶️ | 1 tsp | Freshly cracked preferred |
| Lime Juice 🍋 | 2 tbsp | Freshly squeezed |
The galangal and lemongrass are non-negotiable for that authentic Thai punch. Asian markets usually carry fresh galangal—look for firm, pale rhizomes with no green spots. If you can't find it, ginger plus a pinch of turmeric works in a pinch, though purists will notice the difference. The chicken thighs? Bone-in, skin-on is key—skin crisps beautifully and keeps the meat juicy. Trim any large fat deposits, but leave the skin intact. For the five-spice powder, I always grab the Thai Kitchen brand from World Market—it's got that perfect balance of star anise, clove, and fennel without tasting like Christmas.
No galangal? Double the ginger and add 1/4 tsp turmeric—it's not identical, but you won't taste the difference in the final dish. Running low on fish sauce? Soy sauce plus a splash of lime juice mimics the umami punch. The palm sugar can be swapped for light brown sugar, but it won't caramelize as beautifully. For the double-fry technique, use a deep fryer or heavy pot—never a skillet. The first fry cooks the chicken through, the second creates that signature crunch. Pro tip: Keep your oil temperature at 350°F for the first fry, 375°F for the second. A good thermometer is worth the investment here.
This chicken reheats beautifully—425°F oven for 10 minutes restores the crispiness. Store leftovers in an airtight container for up to 3 days, though I rarely have any last that long. The marinade keeps for 5 days in the fridge if you want to prep ahead. For crowd feeding, double the batch—just make sure your fryer can handle the volume. The flavors actually improve overnight, so make extra if you can. Trust me, you'll want seconds.
Why You'll Love This Recipe
- No Chopping Chaos: I swear by this recipe because the prep is basically just slapping chicken in a bowl. Minimal chopping—just smash the lemongrass and galangal with your palm (or a knife if you’re fancy), toss in the five-spice and fish sauce, and call it a day. The hardest part is waiting for the oven to crisp those skins.
- Umami Bomb: That fish sauce and galangal combo? It’s like a flavor grenade in the best way. The five-spice adds warmth, the lemongrass brightens it up, and the crispy skin? Absolute perfection. It’s the kind of dish that makes you go back for seconds without even thinking.
- Party or Pantry: This chicken is ridiculously versatile. Serve it with rice and a quick cucumber salad for a weeknight dinner, or pile it high on a platter with pickled veggies for a crowd. Honestly, it’s my go-to for birthdays, game days, or just because I’m feeling lazy but still want to impress.
- Leftovers That Don’t Suck: Let’s be real—fried chicken leftovers usually turn into sad, greasy bites. Not this. The marinade keeps it juicy, and the crisp stays intact for days. I portion it out in containers so I can reheat just what I need, whether it’s for lunch or a midnight snack. Budget-friendly? Absolutely. Time-saving? Even more so.
Step-by-step instructions for lemongrass-galangal fried chicken
Here's how to create that signature Thai crunch with impossibly tender, juicy meat inside.
Prepare the Aromatic Marinade
In a food processor, combine the 0.5 cup fresh lemongrass (bruised stalks only), 0.25 cup galangal (peeled and sliced), 2 tbsp five-spice powder, 3 tbsp fish sauce, 0.25 cup palm sugar, 1.5 tbsp kosher salt, and 1 tsp black pepper. Pulse until you achieve a thick, fragrant paste with texture—this ensures maximum flavor penetration.
Transfer the marinade to a large bowl and gently add the 3 lb chicken thighs, coating them thoroughly. Let them marinate in the refrigerator for at least 4 hours, preferably overnight. This step is non-negotiable for achieving that perfect balance of aromatic depth and juiciness. The marinade should be completely absorbed by the chicken before frying.
Create the Crispy Coating
In a separate bowl, whisk together the 1 cup rice flour and 0.5 cup cornstarch. This combination creates the signature double-layered crust that delivers both crispiness and structural integrity. Add the marinated chicken pieces one at a time, ensuring each is completely coated in the flour mixture. Let them sit for 10 minutes to allow the flour to adhere properly.
For the glaze, warm the 0.5 cup coconut milk in a small saucepan over medium-low heat until it reaches 160°F. Remove from heat and stir in the 2 tbsp lime juice. This glaze will be brushed on after frying to add that signature tangy sheen and extra moisture.
Fry to Golden Perfection
Heat 4 cups vegetable oil in a deep fryer or heavy pot to 350°F. Use a thermometer to monitor the temperature—this is critical for achieving that perfect balance of crispy exterior and juicy interior. Working in batches (don't overcrowd the fryer), carefully add the chicken pieces and fry for 6-8 minutes until they reach 180°F internally and develop a deep golden-brown color.
Drain the fried chicken on a wire rack set over a baking sheet to allow excess oil to drip away. Immediately brush each piece with the coconut milk glaze while still hot. This step is crucial—it locks in moisture and adds that signature glossy finish. The chicken should maintain its heat while you finish glazing all pieces.
Rest and Serve
Let the glazed chicken rest for 5 minutes before serving. This brief resting period allows the juices to redistribute, ensuring each bite is perfectly moist. Serve immediately while the exterior remains crispy and the interior stays juicy—this dish doesn't wait.
For optimal presentation, arrange the chicken pieces on a platter and garnish with additional lime wedges. The contrast of the citrus with the rich, aromatic chicken creates a sensory experience that's pure comfort food at its finest. Each bite should deliver that perfect balance of crispy, juicy, and aromatic flavors that define Bangkok street food.
Pro Tips For Making Bangkok Fried Chicken
- Pound the Galangal: Skip the grating—slice it thinly first, then pound it into a paste with the lemongrass and a pinch of salt. I used to miss this step, and the dish always felt off—like something was missing. This releases the galangal’s oils and blends the aromatics into the marinade properly.
- Double-Fry for Crisp: First fry at 325°F (163°C) until internal temp hits 160°F—this cooks the meat through without drying it out. Then crank the heat to 375°F (190°C) for the second fry to get that shatteringly crisp skin. After burning my first batch, I learned: patience in the first fry = reward in the second.
- Dry the Thighs: Pat those bone-in thighs thoroughly with paper towels before marinating—wet skin won’t crisp, no matter how much oil you use. I was skeptical until I tried it; now I swear by it. Even if you’re in a rush, take 2 minutes to do this right.
- Balance the Fish Sauce: Start with 1 tablespoon, taste the marinade, then adjust—fish sauce can overpower if you’re not careful. My grandmother’s trick: add a splash of lime juice first to cut the saltiness before blending. Sounds weird, but it works every time.
Common mistakes when making perfect results
Over-Marinating
The marinade is potent with galangal and fish sauce, so never exceed 24 hours—this can break down the chicken's proteins and make it mushy. I've learned this the hard way after a 36-hour marinade turned my crispy dream into a soggy disappointment.
The ideal window is 4-12 hours in the fridge, where the flavors infuse perfectly without overpowering the meat. 🧂
Skipping the Double-Fry
Many home cooks try to cut corners by frying just once, but this is where the magic happens. The first fry at 350°F cooks the chicken through, while the second at 375°F creates that signature Thai crunch.
I once rushed this step and ended up with chicken that was cooked through but lacked that irresistible crispiness. Trust the process—it's worth the extra 5-7 minutes per batch.
Using the Wrong Oil
Vegetable oil is your best friend here, but olive oil or butter-flavored oil will introduce unwanted flavors that clash with the delicate Thai aromatics. I recommend peanut or canola oil for their neutral taste and high smoke points.
Also, never reuse oil—frying chicken multiple times in the same oil will make your next batch greasy rather than crispy. Fresh oil every time guarantees that perfect golden-brown crust.
Overcrowding the Fryer
This is a common rookie mistake that leads to uneven cooking and soggy chicken. The oil temperature will drop dramatically if you overcrowd, causing the chicken to absorb oil instead of developing that crispy exterior.
I fry in batches of 4-5 pieces at a time, giving each piece plenty of room to develop that golden crust. A good rule of thumb: if the oil level rises more than ½ inch when adding chicken, you're overcrowding.
Neglecting the Resting Time
Those 5 minutes of resting might feel like an eternity when you're eager to serve, but this step is crucial for redistributing juices. I've served this chicken immediately after frying, only to have it release all its juices onto the plate instead of staying tender.
The rest also lets the glaze set properly, giving you that perfect balance of crispy outside and juicy inside. Patience here pays off in every bite. ⏳
Substituting Key Ingredients
While you can swap palm sugar for brown sugar, don't skip the galangal or lemongrass—these are the soul of the dish. I once tried making this with just ginger and turmeric, and while it was decent, it lacked that authentic Thai depth.
The five-spice powder is also essential for that complex aromatic profile. If you must substitute, use Thai Kitchen brand or make your own blend with cloves, star anise, fennel, and cinnamon in equal parts.
Nutrition facts
Frequently asked questions
Why does this recipe use bone-in, skin-on chicken thighs?
The skin creates that signature crispy texture while the bone keeps the meat moist during frying. Thighs stay juicier than breasts during long cooking, and the bone adds natural flavor. For best results, never skip the skin—it's what gives authentic Thai fried chicken its irresistible crunch!
Can I make this recipe without a deep fryer?
Use a heavy pot with at least 3 inches of oil and maintain 350°F temperature with a thermometer. A Dutch oven works perfectly. Just fry in small batches to avoid temperature drops. For extra safety, place the pot on a wire rack over a baking sheet to catch any splatter.
What's the best way to store leftovers?
Let the chicken cool completely, then store in an airtight container for up to 3 days in the fridge. To reheat, bake at 425°F for 10 minutes on a wire rack to restore crispiness. The flavors actually improve overnight, so make extra if possible!
How spicy is this recipe?
The base marinade has mild heat from five-spice powder, but no chili peppers make it completely mild. For extra spice, serve with Thai chili sauce on the side. The galangal and lemongrass provide aromatic depth without heat, making this perfect for all spice preferences.
Can I use chicken breasts instead of thighs?
Not recommended—they'll dry out during frying. If you must use breasts, brine them for 1 hour first (1/4 cup salt per 4 cups water) to keep them juicy. However, thighs are ideal because their higher fat content stays tender during the double-fry process.