
Main Courses
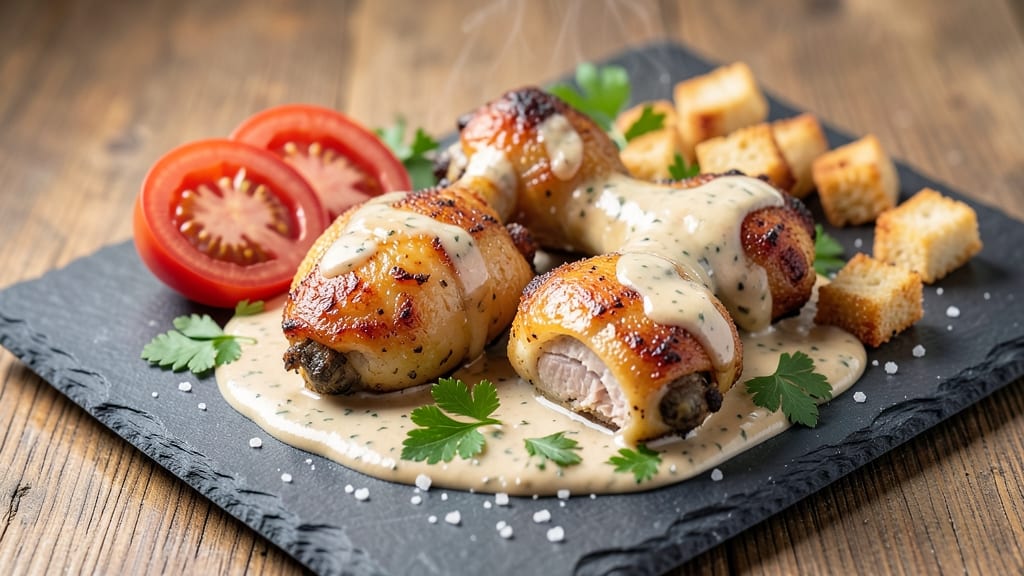
This baked ranch chicken legs recipe transforms simple ingredients into crispy, herby perfection that'll become your new favorite weeknight dinner.
The secret lies in a buttermilk brine that tenderizes the meat while creating that coveted crispy skin, paired with a homemade ranch seasoning that delivers bold, tangy flavor in every bite. I've perfected this method over countless batches—no deep-frying required, just oven magic that delivers restaurant-quality results at home.
What sets this recipe apart is the combination of techniques: the buttermilk brine ensures juicy, tender meat, while the ranch-inspired seasoning creates a flavor profile that's both familiar and elevated. You'll bake the chicken at 375°F for about 45-50 minutes, flipping once for even cooking and maximum crispiness.
The process is straightforward but yields a dish that's impossible to resist—crispy edges, tender meat, and that perfect herby tang that makes every bite satisfying.
The result is golden-brown chicken legs with a texture that's crispy outside and impossibly tender inside, all coated in that irresistible ranch flavor. This recipe serves four and comes together in under an hour, making it ideal for busy weeknights when you still want a meal that feels special.
The best part? Leftovers reheat beautifully, so you can enjoy this flavorful dish all week long.
Serve with classic sides like roasted potatoes or a fresh garden salad to complete the meal. The crispy, herby chicken legs will be the star of your dinner table, proving that simple ingredients and the right technique can create something truly exceptional. Let's get started on this crowd-pleasing dish!
Ingredients for baked ranch chicken legs
Buttermilk brine, crispy skin, and herby ranch seasoning—this combo delivers restaurant-quality flavor at home.
| Ingredient | Amount | Notes |
|---|---|---|
| Chicken Legs 🍗 | 4 pieces | Bone-in, skin-on, similar size |
| Buttermilk 🥛 | 1 cup | Full-fat for best flavor |
| All-Purpose Flour 🌾 | ½ cup | For dredging chicken |
| Dried Ranch Seasoning 🧂 | 2 tbsp | Homemade or store-bought |
| Garlic Powder 🧄 | 1 tbsp | Freshly ground preferred |
| Onion Powder 🧅 | 1 tbsp | For depth of flavor |
| Dried Parsley 🌿 | 1 tbsp | For herby brightness |
| Salt 🧂 | 1 tsp | Diamond Crystal preferred |
| Black Pepper 🌶️ | ½ tsp | Freshly cracked |
| Olive Oil 🫒 | 2 tbsp | For crispy coating |
| Fresh Dill 🌿 | 2 tbsp | Chopped, for garnish |
| Lemon Juice 🍋 | 1 tbsp | Brightens flavor |
The chicken legs are the star, so grab bone-in, skin-on pieces—the skin crisps up beautifully, and the bone keeps the meat juicy. I always buy mine from Costco when possible, but any grocery store's fresh chicken works. Look for legs with a vibrant pink color and minimal bruising. The buttermilk? Full-fat is key—it adds richness that low-fat versions just can't match. If you're short on time, whole milk plus 1 tbsp vinegar works in a pinch, but buttermilk is worth tracking down for that authentic tang.
No ranch seasoning packet? Mix 1 tbsp dried parsley, 1 tbsp onion powder, 1 tbsp garlic powder, 1 tsp dried dill, 1 tsp paprika, and 1/2 tsp black pepper—it's a game-changer. Fresh dill is ideal for garnishing, but dried dill at one-third the amount works if you're in a bind. The olive oil helps create that crispy crust, so don't skip it—even though it's just 2 tablespoons. For extra flavor, I like to add a generous pinch of smoked paprika to the seasoning mix, but regular ranch seasoning works perfectly fine too.
This recipe reheats like a dream—honestly better the next day once the flavors meld. Store leftovers in the fridge for up to 4 days or freeze for 3 months. I like to portion mine into single-serving containers so I can grab one for lunch without reheating the whole batch. The buttermilk brine can be prepped up to 24 hours ahead—just keep it cold until you're ready to use it. And if you're feeling fancy, broil for 2-3 minutes at the end to get extra crispy skin.
Why You'll Love This Recipe
- No-Fuss Coating: I just toss the flour and ranch mix right into the buttermilk—no measuring cups, no fuss. The buttermilk soaks in while you wait, so the seasoning sticks like glue without extra effort.
- Crispy-Creamy Magic: That buttermilk dip gives the crust a tender bite, while the ranch and garlic powder make every bite taste like a loaded nacho. Honestly, the contrast is what makes it ridiculous good.
- Weeknight Hero: Throw them in the oven while you chop veggies or set the table—no babysitting required. My kids grab them straight from the pan, and I still have time to breathe.
- Budget-Buster Leftovers: Chicken legs stretch my grocery budget, and these stay juicy for days. Reheat in the oven or air fryer, and they’re just as good the third time around. (Yes, even on a Tuesday night.)
Step-by-step instructions for buttermilk brine crispy ranch chicken legs
Here's how to transform simple chicken legs into restaurant-worthy bites with crispy skin and herby ranch flavor.
Create the Buttermilk Brine for Maximum Tenderness
In a shallow dish large enough to hold the 4 pieces chicken legs, combine the 1 cup buttermilk, 1 tablespoon garlic powder, 1 tablespoon onion powder, 1 tablespoon dried parsley, 1 teaspoon salt, and 0.5 teaspoon black pepper. Stir until everything is fully dissolved—this creates your marinade and brine in one.
The buttermilk works magic here by breaking down the chicken's proteins, ensuring juicy meat while the seasonings penetrate deeply. Let the chicken legs soak for at least 30 minutes, but I recommend going up to 2 hours in the refrigerator for maximum flavor infusion. Flip them halfway through soaking for even treatment.
Build the Ranch Coating for Crispy Perfection
In a separate bowl, whisk together the 0.5 cup all-purpose flour and 2 tablespoons dried ranch seasoning. This creates your dry coating that will give the chicken its signature flavor and crispy texture. Once the chicken has finished soaking, remove it from the buttermilk mixture and let any excess drip off.
Working with one piece at a time, press each chicken leg into the flour mixture, coating all sides thoroughly. The flour should adhere well but not form clumps. I press gently but firmly—this ensures even coverage that will crisp beautifully in the oven. Place the coated legs on a wire rack set over a baking sheet.
Drizzle and Bake for Crispy Skin
Preheat your oven to 425°F with the rack positioned in the middle position. Lightly drizzle the 2 tablespoons olive oil over the coated chicken legs, making sure to cover all surfaces. The oil helps create that golden-brown crust we're after.
Bake for 45 minutes, flipping the legs halfway through at the 22-minute mark. You'll know they're ready when the skin is deep golden brown and crispy, and the internal temperature reaches 175°F at the thickest part of the thigh. The legs should release easily from the rack when done.
Finish with Herby Lemon Sauce
While the chicken bakes, combine the 2 tablespoons fresh dill, 1 tablespoon lemon juice, and any remaining buttermilk mixture from the soaking dish in a small bowl. Whisk until smooth—this becomes your finishing sauce. Once the chicken is done, transfer it to a serving platter and drizzle with the herby sauce.
The lemon juice brightens the rich flavors while the dill adds that fresh herby note that ties everything together. Serve immediately while the chicken is still crispy and the sauce is warm. These chicken legs are perfect for game day, family dinners, or as a crowd-pleasing appetizer when sliced into bite-sized pieces.
Pro Tips For Making Baked Ranch Chicken Legs
- CRANK THE OVEN HIGH: Start your chicken legs at 425°F (220°C) for the first 15 minutes—this sears the crust and locks in flavor before the buttermilk marinade gets a chance to steam. I learned this the hard way after making soggy, pale legs by baking at 375°F the whole time.
- DRY THE LEGS WELL: Pat those chicken legs thoroughly with paper towels before dredging in flour—wet spots turn your crust to glue. I skip this sometimes, and the flour just slides off, leaving you with bland, uncoated meat.
- USE COLD BUTTERMILK: Chill the buttermilk for at least 30 minutes before dipping—cold buttermilk clings better to the flour and creates a thicker, more flavorful crust. Sounds weird, but it works: the first batch I made with room-temp buttermilk ended up greasy and uneven.
- DON’T OVERMIX THE BREADING: Toss the flour and ranch seasoning lightly—just until the legs are lightly coated, not buried. Overmixing packs the flour too tightly, leading to a dense, dry crust instead of a crispy, airy one. (Your future self will thank you.)
Best sauces and condiments for this dish
Classic Ranch Sauce
This recipe's signature flavor comes from a homemade ranch sauce that's easier than you think.
Mix ½ cup sour cream, 2 tablespoons mayonnaise, 1 tablespoon lemon juice, 1 tablespoon fresh dill, 1 teaspoon dried parsley, ½ teaspoon garlic powder, and ¼ teaspoon onion powder. I like to add a pinch of Worcestershire sauce for depth.
Serve warm or cold—it's perfect for dipping or drizzling over the finished chicken. 🥛
Spicy Ranch Twist
For a kick, blend ½ teaspoon cayenne pepper or 1 tablespoon hot sauce (like Cholula) into your ranch sauce. The heat balances beautifully with the buttermilk's tang.
I also add a sprinkle of smoked paprika for extra complexity. This version pairs especially well with cooling sides like cucumber salad or creamy coleslaw.
Garlic-Herb Butter
Melt 2 tablespoons butter with 1 minced garlic clove, 1 teaspoon dried dill, ½ teaspoon dried parsley, and a pinch of salt. Drizzle this over the baked chicken just before serving for a rich, savory finish.
The butter adds moisture while the herbs enhance the ranch flavors. I love this when serving with roasted vegetables or mashed potatoes.
Honey-Mustard Glaze
Whisk together 2 tablespoons Dijon mustard, 1 tablespoon honey, 1 teaspoon apple cider vinegar, and ½ teaspoon dried dill. Brush this glaze over the chicken legs during the last 10 minutes of baking.
The sweetness complements the ranch perfectly while adding a glossy finish. This works especially well for holiday gatherings or when you want a slightly sweeter profile.
Creamy Dill Sauce
Blend ½ cup Greek yogurt, 1 tablespoon lemon juice, 1 tablespoon fresh dill, ½ teaspoon garlic powder, and ¼ teaspoon salt until smooth. This tangy, creamy sauce is lighter than traditional ranch but still packs big flavor.
It's fantastic for dipping or as a topping for salads or vegetable platters. The Greek yogurt adds protein and keeps it fresh-tasting.
Smoky Chipotle Ranch
For a smoky depth, blend 1 teaspoon adobo sauce (from canned chipotle peppers) into your ranch sauce. Add ½ teaspoon ground cumin and a pinch of smoked salt for extra complexity.
This version has a subtle heat that pairs wonderfully with grilled corn or charred zucchini. The smokiness elevates the classic ranch flavor to new heights. 🔥
Nutrition facts
Frequently asked questions about baked ranch chicken legs
Can I use boneless chicken legs for this recipe?
While you can technically use boneless legs, the recipe is designed for bone-in pieces to ensure maximum juiciness and flavor. The bone helps retain moisture during baking, creating that perfect tender texture. If you must use boneless, reduce baking time by about 5-10 minutes and check for doneness at 165°F internal temperature.
How do I get extra crispy skin on my baked chicken?
The secret lies in the buttermilk brine and proper baking technique. Pat the chicken completely dry before coating, and use a wire rack over a baking sheet to allow air circulation. Drizzle with olive oil right before baking, and consider broiling for 2-3 minutes at the end for maximum crispiness. Avoid overcrowding the pan to prevent steaming.
Can I make this recipe ahead of time?
These chicken legs actually taste better the next day as the flavors meld. Store in an airtight container in the fridge for up to 4 days or freeze for 3 months. Reheat at 350°F for 15-20 minutes until warmed through. The skin may lose some crispness, so broil for 1-2 minutes after reheating to restore it.
What's the best way to serve these ranch chicken legs?
These crispy legs shine with classic sides like roasted potatoes, garlic mashed potatoes, or a fresh garden salad. For a complete meal, pair with corn on the cob or steamed green beans. Serve with your favorite dipping sauce (try the classic ranch sauce from the recipe) or drizzle with the herby lemon sauce for extra flavor.
Why did my chicken come out dry?
Overcooking is the most common cause. Use a meat thermometer to check for 175°F internal temperature at the thickest part of the thigh. The buttermilk brine helps prevent dryness, but don't skip it! Also ensure your oven isn't running too hot by using an oven thermometer. Bake at 425°F as directed for perfect juicy results.