
Main Courses
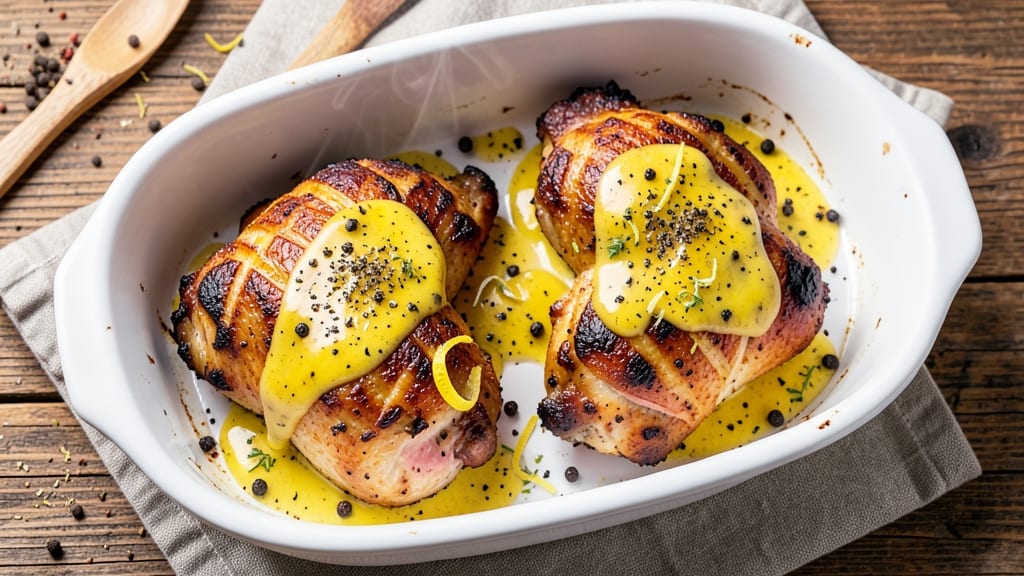
This baked lemon pepper chicken thighs recipe delivers the perfect balance of crispy skin and juicy interiors with a bright, zesty crust that elevates any weeknight dinner.
The secret lies in marinating the chicken just long enough to infuse flavor without overpowering the natural taste, then baking at the right temperature to achieve that coveted texture contrast.
I've perfected this method over countless batches, ensuring every bite is tender yet crisp enough to stand up to the bold lemon-pepper seasoning.
The beauty of this recipe is its simplicity—just a handful of pantry staples come together to create restaurant-quality results. We're talking golden-brown skin that shatters slightly when you cut in, juices that flow freely when pierced with a fork, and a flavor profile that's tangy, slightly spicy, and perfectly balanced.
The lemon-pepper crust doesn't just add flavor; it transforms ordinary chicken into something special that'll have everyone asking for seconds.
What makes this recipe truly foolproof is the baking technique: high heat initially to render fat and create crispiness, then a gentle finish to ensure the chicken cooks through evenly.
The result is chicken that's ready in about 35 minutes, giving you plenty of time to prepare complementary sides like roasted vegetables or a fresh salad. The bright citrus notes in the crust pair beautifully with these options, creating a complete meal that's both satisfying and balanced.
This method works equally well for feeding a family or meal prepping for the week. The leftovers reheat beautifully while maintaining that perfect texture contrast. Whether you're hosting dinner guests or simply treating yourself to a special meal, these lemon pepper chicken thighs will deliver consistent, impressive results every time.
Ingredients for baked lemon pepper chicken thighs
Pantry staples plus fresh citrus and herbs transform simple chicken thighs into restaurant-worthy bites.
| Ingredient | Amount | Notes |
|---|---|---|
| Chicken Thighs 🍗 | 1 ½ lb | Bone-in, skin-on preferred |
| Lemon Zest 🍋 | 1 tbsp | From 1 large lemon |
| Lemon Juice 🍋 | 2 tbsp | Freshly squeezed |
| Crushed Black Peppercorns 🌶️ | 1 tbsp | Freshly ground preferred |
| Ground Black Pepper 🌶️ | 1 tsp | For extra heat |
| Kosher Salt 🧂 | 1 ½ tsp | Diamond Crystal preferred |
| Garlic Cloves 🧄 | 4 cloves | Minced for marinade |
| Olive Oil 🫒 | 2 tbsp | Extra-virgin for richness |
| Cornstarch 🌾 | 1 tbsp | For crispy coating |
| Fresh Parsley 🌿 | ¼ cup | Chopped, for garnish |
| Butter 🧈 | 1 tbsp | Unsalted, for basting |
The chicken thighs are non-negotiable—bone-in, skin-on gives you that crispy skin and juicy interior. Look for thighs with good marbling at stores like Whole Foods or your local butcher shop. If you can't find bone-in, skin-on, boneless skinless works but won't be as crispy. The lemon should be bright yellow with a firm texture—organic lemons from Trader Joe's or your local farmers market are ideal. For the peppercorns, Penzeys or bulk bins at natural grocery stores offer the freshest grind. If you're using pre-ground pepper, it's still fine but loses some punch—freshly crushed is worth the extra minute.
No lemon zest? Substitute with 1 tbsp extra lemon juice—it won't be as aromatic but still adds brightness. Running short on black peppercorns? Ground black pepper works at the same amount, though the texture will differ slightly. The cornstarch is key for that crispy crust—arrowroot powder works too if you've got it. For the butter, European-style unsalted like Plugrá melts beautifully. If you're avoiding dairy, use an equal amount of olive oil instead. The parsley is just for garnish, so dried works in a pinch if you're out of fresh—just use half the amount.
Store the raw chicken in the coldest part of your fridge, using within 2 days for best texture. The lemon zest and juice can be prepped ahead and stored in an airtight container for 3 days. For meal prep, bake these ahead and refrigerate for up to 3 days—reheat at 350°F for 10 minutes to restore crispiness. The leftovers reheat beautifully, though the crust won't be quite as crisp. Freeze cooked thighs for 3 months by wrapping tightly in foil and plastic wrap. Thaw overnight in the fridge before reheating.
Why You'll Love This Recipe
- No-Fuss Prep: I swear by this recipe because it’s three ingredients plus salt—literally. Toss the thighs with lemon zest, crushed peppercorns, and a splash of juice, then bake. The hardest part is waiting for the oven timer. (Yes, even on a Tuesday night.)
- Crispy-Creamy Magic: That golden crust? The peppercorns crackle under your teeth while the inside stays juicy. The lemon zest clings like a bright little hug—no complicated marinades, just ridiculously good flavor from the get-go.
- Meal Prep MVP: Make a double batch on Sunday, and you’ve got lunch for days. The thighs reheat beautifully—toss them in a salad, wrap them in tortillas, or serve over rice. Honestly, I’ve eaten them cold straight from the fridge, and no one judged me.
- Budget Win: Chicken thighs are forgiving and cheap, and this recipe doesn’t waste a thing. The lemon and pepper turn a simple protein into something feels fancy—perfect for when you want to impress without breaking the bank. (Between us, my roommate still thinks I’m a chef.)
Step-by-step instructions for baked lemon pepper chicken thighs
Here's the method for achieving that perfect balance of crispy, aromatic crust and tender, juicy chicken every time.
Prep and Marinate the Chicken Thighs
Pat the 1.5 lb chicken thighs completely dry with paper towels—this is crucial for crispy skin. Season both sides generously with 1.5 tsp kosher salt and 1 tbsp crushed black peppercorns, pressing firmly so the seasoning adheres. In a small bowl, whisk together 2 tbsp lemon juice, 1 tbsp lemon zest, 1 tsp ground black pepper, and 4 cloves minced garlic cloves. Pour this marinade over the chicken and turn to coat evenly.
Let the chicken marinate for at least 30 minutes at room temperature. This allows the flavors to penetrate deeply and ensures the skin crisps beautifully. I like to place the thighs on a wire rack set over a plate to prevent them from sitting in any pooled marinade, which can make the skin soggy.
Create the Crispy Coating
In a separate bowl, combine 1 tbsp cornstarch and 2 tbsp olive oil. This mixture is what will create that signature crispy crust. Remove the chicken from the marinade (reserve the marinade for basting) and toss each thigh in the cornstarch-oil mixture, pressing gently to ensure an even coating. Place the coated thighs on a wire rack set over a baking sheet lined with parchment paper.
This step is where the magic happens. The cornstarch helps create a dry, crispy exterior while the olive oil adds richness. Don't skip this—it's what gives these thighs that irresistible texture contrast between the crispy crust and juicy interior.
Bake to Golden Perfection
Preheat your oven to 425°F and bake the chicken thighs for 35-40 minutes, flipping them halfway through the baking time. You want the skin to be deep golden brown and crispy, while the internal temperature reaches 165°F at the thickest part of the thigh. During the last 10 minutes of baking, brush the thighs with the reserved marinade every 5 minutes to keep them juicy and infuse extra flavor.
Here's the thing—I always check the skin color before relying on the thermometer. If the skin isn't golden brown by 35 minutes, it needs more time. The crispy crust is what makes these thighs special, so don't rush this step. The chicken will carry over in temperature during resting, so it won't overcook.
Rest and Finish
Transfer the baked chicken thighs to a plate and let them rest for 5-10 minutes before serving. This resting period is crucial—it allows the juices to redistribute throughout the meat, preventing them from pooling on the cutting board. While they rest, melt 1 tbsp butter in a small saucepan over low heat and stir in 0.25 cup chopped fresh parsley. This creates a quick pan sauce that adds extra richness and freshness.
Slice the chicken thighs against the grain for maximum tenderness, then drizzle with the parsley butter sauce. The result should be a perfect balance of crispy, aromatic skin with juicy, flavorful meat underneath. Serve immediately with your favorite sides to enjoy that restaurant-quality texture and flavor at home.
Pro Tips For Making Baked Lemon Pepper Chicken Thighs
- Use Bone-In, Skin-On Thighs: I learned this the hard way—skinless, boneless thighs dry out faster. The skin crisps beautifully with the lemon zest, and the bone keeps the meat juicy. If you only have boneless, pat them extra dry before baking—it makes a real difference.
- Zest First, Juice Last: Crushed black peppercorns lose their punch when soaked in lemon juice. Zest the lemon before juicing, then toss the zest with the thighs while they’re still raw. Add the juice later—right before baking—so the pepper stays sharp and the skin doesn’t steam instead of crisp.
- Don’t Overcrowd the Pan: I used to stack thighs like a lazy chef, and they’d steam instead of brown. Arrange them in a single layer, skin-side up, with just enough space to breathe. If your pan’s too small, bake in batches—golden skin happens at 425°F, not in a crowded, sad pile.
- Rest Them Under Foil: After pulling them from the oven, tent the thighs with foil for 5–10 minutes. This traps heat and lets the juices redistribute—no one wants a slice that oozes like a sad soup. (Yes, even if you’re impatient like me.)
Essential equipment for perfect results
Oven Essentials
Your oven is the star of this recipe, so invest in a quality infrared thermometer like the Thermoworks Oven Thermometer to ensure accurate temperature readings—especially important when baking at 425°F. I’ve found that most home ovens run 10-25°F hotter than their set temperature, so calibrate yours before starting.
Preheat for 15 minutes to establish even heat distribution, and avoid opening the door during the first 20 minutes of baking to maintain crispiness. 🔥
Wire Rack Game-Changer
A wire rack is non-negotiable for this recipe—it elevates the chicken thighs, allowing hot air to circulate underneath and create that golden-brown, crispy skin on all sides. I use a stainless steel rack from Amazon Basics (around $10) because it’s durable and fits perfectly on most baking sheets.
If you don’t have one, a cooling rack from the dollar store works in a pinch, but avoid placing chicken directly on the sheet pan.
Basting Brush Precision
For basting the reserved marinade during the last 10 minutes of baking, use a silicon basting brush like the OXO Good Grips—it’s heat-resistant and won’t leave bristle bits behind. Avoid metal brushes, as they can scratch nonstick pans or leave residue.
I keep a small bowl of marinade nearby and baste every 5 minutes to lock in moisture and deepen the lemon-pepper flavor. 💫
Parchment Paper Hacks
Line your baking sheet with heavy-duty parchment paper (I swear by Glad brand) to prevent sticking and make cleanup effortless. Cut the paper to fit snugly—no overhang—so it doesn’t curl up during baking.
Pro tip: Draw a light pencil line on the parchment where you’ll place the chicken thighs. This ensures consistent spacing and even browning. If you’re short on parchment, a light coating of olive oil on the baking sheet works, but parchment is easier for crispy results.
Thermometer Must-Have
A meat thermometer is your best friend for foolproof doneness. I recommend the Thermoworks Smoke for its precision and durability—it reads 165°F at the thickest part of the thigh without overcooking. Insert the probe into the deepest part of the meat, avoiding bone or fat.
If your thermometer lacks a high-temp probe, use a digital instant-read thermometer like Thermapen for accuracy. Never guess—this is how you avoid dry, overcooked chicken. 🌡️
Butter and Parsley Tools
For the finishing parsley butter sauce, use a small saucepan with sloped sides (like All-Clad Stainless) to prevent splattering when melting the 1 tbsp butter. A sharp chef’s knife (I love Mercer Culinary) is essential for chopping 0.25 cup fresh parsley into fine, even pieces.
If you’re short on time, a microplane works wonders for quick, consistent mincing. Store leftover butter in an airtight container in the fridge for up to 1 week—it’s perfect for future garnishes or compound butters.
Nutrition facts
Frequently asked questions
Can I use boneless, skinless chicken thighs instead?
The recipe works with boneless skinless thighs, but you'll lose that signature crispy skin. For best results, pat the thighs dry and coat them with 1 tbsp cornstarch mixed with 1 tbsp olive oil before baking. Expect a slightly shorter baking time of 25-30 minutes at 425°F since they cook faster without bone and skin.
How do I make this recipe air fryer-friendly?
Preheat your air fryer to 400°F and place the seasoned thighs in a single layer. Cook for 12-15 minutes, flipping halfway, until the skin reaches 165°F internally. For extra crispiness, brush with a little olive oil before air frying. The air fryer reduces cooking time significantly while maintaining that perfect texture contrast.
Can I prepare this recipe ahead of time?
Marinate the chicken up to 24 hours ahead and store it in the fridge. For make-ahead baking, prepare the thighs completely (including the cornstarch coating) and refrigerate them uncovered for 1 hour before baking. This helps crisp the skin even more. Reheat baked thighs at 350°F for 10 minutes to restore crispiness.
What's the best way to reheat leftovers?
Reheat leftovers in a 400°F oven for 10-12 minutes to maintain crispiness. For a quick option, use an air fryer at 375°F for 5-7 minutes. Avoid microwaving as it makes the skin soggy. To refresh the crust, broil for 1-2 minutes at the end of reheating. The internal temperature should reach 165°F when done.
Can I substitute lemon pepper seasoning?
Yes, but you'll need to adjust the balance. Use 1 tbsp lemon pepper seasoning (like McCormick) plus 1 tbsp extra lemon zest for brightness. If using store-bought seasoning without lemon, add 1 tbsp extra lemon juice to compensate. The key is maintaining that tangy-sweet contrast that makes this recipe special.