
Sauces & Condiments
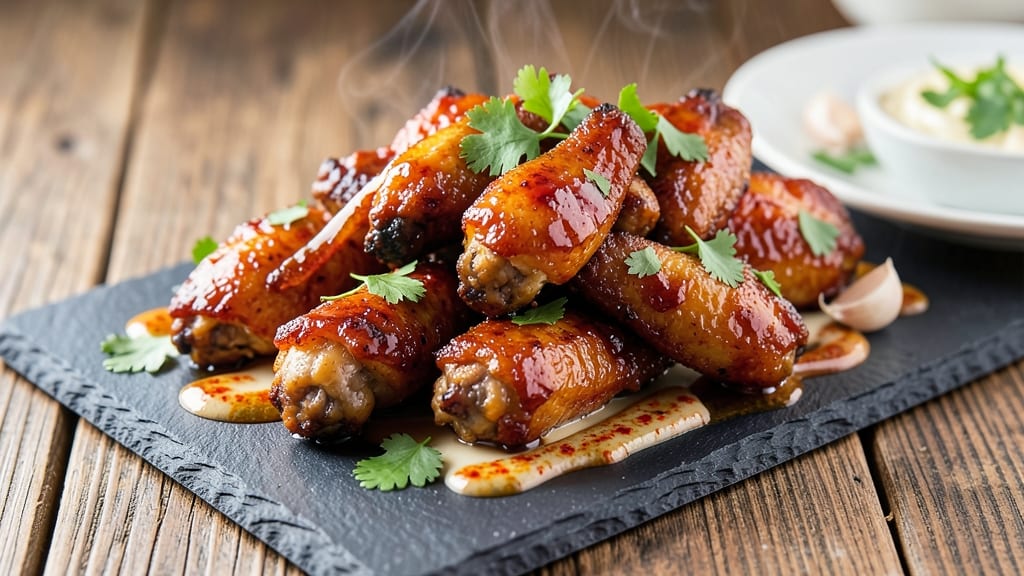
This baked chicken wings sauce recipe transforms ordinary wings into finger-licking masterpieces with its perfect balance of smoky, garlic, and honey notes. The secret lies in a slow-simmered glaze that caramelizes beautifully while keeping the wings' edges crispy—no deep-frying required.
I developed this sauce after years of testing, and it consistently delivers that restaurant-quality stickiness without being overly sweet or greasy.
The foundation is a simple blend of garlic, smoked paprika, and a touch of cayenne for depth, all dissolved in honey and apple cider vinegar. This combination creates a sauce that's rich enough to cling to wings but light enough to serve as a dipping sauce.
What sets it apart is the 30-minute simmer, which allows the flavors to meld into a glossy, aromatic glaze that enhances rather than overpowers the chicken.
By the time you're done, your wings will be coated in a sauce that's perfectly balanced—sweet from the honey, smoky from the spices, and tangy from the vinegar. The glaze caramelizes into a sticky, slightly crispy finish that makes every bite irresistible.
This sauce works equally well as a post-bake glaze or as a dip for crispy wings straight from the oven.
Make a double batch—this sauce keeps well in the fridge for up to 2 weeks, making it perfect for meal prep or entertaining. The ingredients are simple, but the results are anything but basic. Let's get cooking!
Ingredients for baked chicken wings sauce
Nine simple ingredients create this restaurant-quality glaze that'll make your wings unforgettable.
| Ingredient | Amount | Notes |
|---|---|---|
| Honey 🍯 | ½ cup | Raw or pure for best flavor |
| Apple Cider Vinegar 🍏 | ¼ cup | Bragg is my go-to brand |
| Smoked Paprika 🌶️ | 2 tbsp | For that smoky depth |
| Garlic Cloves 🧄 | 4 cloves | Freshly minced for punch |
| Cayenne Pepper 🔥 | ½ tsp | Adjust for heat preference |
| Kosher Salt 🧂 | 1 tsp | Diamond Crystal preferred |
| Black Pepper 🌶️ | ½ tsp | Freshly ground for best flavor |
| Olive Oil 🫒 | 1 tbsp | Extra-virgin for richness |
| Soy Sauce 🍜 | 1 tbsp | For umami depth |
| Brown Sugar 🍚 | 1 tbsp | Light or dark works fine |
The honey is the star here—raw or pure makes all the difference. Trader Joe's has great options, but any local honey works too. Apple cider vinegar adds that tangy kick, and Bragg is my go-to brand, but any organic vinegar will do. Smoked paprika is non-negotiable for that smoky depth—Penzeys has the best quality if you're willing to splurge. Fresh garlic is ideal, but if you're in a pinch, jarred minced garlic works (just use a little more).
No smoked paprika? Regular paprika plus a pinch of liquid smoke gets you close. Short on honey? Maple syrup works at a 1:1 ratio. Want more heat? Add an extra pinch of cayenne. The soy sauce brings umami, so don't skip it—Kikkoman or any low-sodium brand works. The brown sugar helps balance the tang, but if you're avoiding sugar, skip it entirely. Olive oil ties everything together, so use the good stuff—extra-virgin for the best flavor.
This sauce keeps for 2 weeks in the fridge, so make a double batch. Store it in a glass jar with a tight seal. It reheats beautifully—just warm it gently on the stove or microwave for 20 seconds. Perfect for meal prep or game day. Freeze portions in ice cube trays for single-use servings.
Why You'll Love This Recipe
- Five-Ingredient Magic: Honestly, I swear by this sauce because it’s that simple. Just honey, vinegar, smoked paprika, garlic, and a pinch of cayenne—no fancy gadgets, no measuring cups with weird lines. You’ll have sticky, smoky wings ready while you’re still waiting for the oven to preheat.
- Sweet-Spicy Balance: That honey and vinegar combo? It’s the kind of tangy-sweetness that makes you forget about store-bought sauces. The smoked paprika adds this deep, earthy warmth, and the cayenne? Just enough heat to wake up your taste buds without stealing the show.
- Game for Any Meal: Between us, this sauce works on game day, lazy Sundays, or when you’re too tired to order takeout. Toss it on wings, drizzle it over grilled chicken, or even stir it into a quick salad dressing—it’s my go-to for when I need something reliable.
- Leftovers That Don’t Suck: I make a double batch every time because the sauce keeps for weeks in the fridge. The flavors actually get better as it sits, and you can always tweak the cayenne next time if someone in your house is sensitive to heat. Zero waste, all flavor.
Step-by-step instructions for smoky garlic-honey glazed wings
Here's how to make wings with crispy edges and a sticky, smoky-sweet glaze that'll have everyone begging for seconds.
Prep the Wings for Maximum Crispiness
Pat 4 pounds of chicken wings completely dry with paper towels—this is non-negotiable for crispy skin. I mean really dry, especially around the joints where moisture tends to hide. Separate them into drumettes, flats, and wings, discarding any excess fat.
In a large bowl, toss the wings with 1 tablespoon olive oil until evenly coated. Then sprinkle with 1 teaspoon kosher salt, ½ teaspoon black pepper, and 2 tablespoons smoked paprika, pressing the spices into the skin so they stick. Let them sit at room temperature for 30 minutes while you preheat the oven to 425°F. This resting time ensures even cooking and maximum crispiness.
Bake Until Golden and Crispy
Arrange the wings in a single layer on two rimmed baking sheets lined with parchment paper. Make sure they're not touching—crowding steams instead of crisps. Bake for 45 minutes, flipping them halfway through at the 22-minute mark. You're looking for skin that's deep golden brown and crispy enough to crackle when you touch it.
Here's the thing—don't peek too early. The oven needs to maintain that high heat to create those crispy edges. If you open the door before the 45 minutes, you'll lose heat and end up with soggy wings. Trust the timer and the visual cues.
Make the Smoky Garlic-Honey Glaze
While the wings bake, make the sauce by combining ½ cup honey, ¼ cup apple cider vinegar, 1 tablespoon soy sauce, 1 tablespoon brown sugar, 4 minced garlic cloves, and ½ teaspoon cayenne pepper in a saucepan. Bring to a simmer over medium heat, then reduce to low and let it bubble away for 10-12 minutes until it thickens slightly and coats the back of a spoon.
You'll know it's ready when the mixture turns a deep amber color and smells like a sweet-smoky paradise. The sauce should coat the back of a spoon but still be pourable—not syrupy. If it thickens too much, add 1-2 teaspoons of water to loosen it up.
Glaze and Finish
Once the wings are crispy, transfer them to a large bowl. Pour the warm glaze over them and toss gently to coat evenly. Return the wings to the baking sheets and bake for an additional 8-10 minutes at 425°F, basting them with extra glaze halfway through. This final step caramelizes the glaze and gives you that perfect balance of sticky and crispy.
Watch for the glaze to bubble and darken slightly—that's your signal it's ready. The wings should be glossy, sticky, and still crispy to the touch. If you see any areas losing crispiness, pop them back under the broiler for 1-2 minutes to revive the edges.
Rest and Serve
Transfer the glazed wings to a serving platter and let them rest for 5 minutes. This short rest lets the juices redistribute so every bite is packed with flavor. Serve immediately with extra glaze on the side for dipping—trust me, you'll want it.
For the ultimate presentation, sprinkle with chopped fresh parsley or crushed red pepper flakes if you want to kick up the heat. The contrast of crispy skin and sticky-sweet glaze is what makes these wings irresistible. Enjoy while they're hot!
Pro Tips For Making Baked Chicken Wings Sauce
- Simmer the Vinegar First: I learned this the hard way—dumping raw apple cider vinegar into hot honey makes the sauce clump like glue. Instead, warm the vinegar alone for 30 seconds until it steams, then pour it into the honey. The sauce will blend smoother and taste brighter, not sour or metallic.
- Toast the Garlic Cloves: Whole garlic cloves in this sauce? Toss them in a dry pan over medium heat for 2-3 minutes until golden and fragrant. The nutty depth they add is worth the extra step—crushed raw garlic will burn and turn bitter before the sauce is ready.
- Balance the Cayenne Gradually: Start with half the cayenne, taste, then add more. I’ve ruined batches by assuming "a pinch" is the same for everyone. The honey and vinegar already pack punch; cayenne just needs to play a supporting role, not steal the show.
- Thin with Warm Water, Not Cold: If your sauce is too thick, resist the urge to add cold liquid—it’ll shock the honey and make it seize. Use warm (not boiling) water, 1 tablespoon at a time, until it coats the back of a spoon. The sauce will still cling to the wings without turning watery.
Storing and reheating this dish
Sauce Storage Tips
The glaze keeps beautifully in the fridge for up to 2 weeks in an airtight glass jar. I always make a double batch because it’s perfect for meal prep—just reheat gently on the stovetop over low heat for 3-5 minutes until warm.
The sauce thickens slightly when cold, so add 1-2 teaspoons of water when reheating to restore its pourable consistency. 🍯
Wings Reheating Guide
Reheat baked wings in the oven for the best results. Place them on a baking sheet at 375°F for 10-12 minutes to revive crispiness. For a quick fix, microwave for 45-60 seconds (covered with a damp paper towel) but expect slightly softer edges.
If reheating from frozen, add 5 extra minutes to ensure even warming. 🔥
Freezing Sauce for Later
Portion the glaze into ice cube trays for single-use servings—just pop out what you need and thaw in the fridge overnight. For larger batches, store in freezer-safe containers with 1-inch headspace to prevent expansion cracks.
Thaw in the fridge for 8-12 hours before reheating. The sauce’s texture remains perfect after freezing, though it may separate slightly—just stir before using. ❄️
Reviving Crispy Edges
If your reheated wings lose crispiness, broil them for 1-2 minutes at the end. Place the tray on the top rack and watch closely to avoid burning.
For extra crunch, toss wings with ½ teaspoon cornstarch before reheating—this creates a light, crispy barrier. I swear by this trick for takeout-style wings! 💫
Sauce Flexibility
This glaze works as a dip too—simmer extra sauce until thicker, then chill for 2 hours to set. Serve with celery sticks or carrot sticks for a game-day appetizer.
For spicier wings, add ½ teaspoon cayenne to the reheated sauce. The flavors only get better with time, so don’t hesitate to make ahead! 🌶️
Nutrition facts
Frequently asked questions
Can I make this sauce without honey?
Yes! For a vegan option, substitute honey with ½ cup maple syrup or agave nectar. The sauce will still caramelize beautifully, though the flavor profile will be slightly less complex. If avoiding sweeteners entirely, reduce the brown sugar to ½ tablespoon and add 1 teaspoon lemon juice for balance.
How do I adjust the heat level?
Start with ½ teaspoon cayenne for mild heat, then increase to 1 teaspoon for medium, or 1½ teaspoons for spicy. For extra kick, add ½ teaspoon crushed red pepper flakes to the sauce after simmering. If you love smoky heat, swap ½ teaspoon smoked paprika for regular paprika and add ¼ teaspoon liquid smoke.
Can I use this sauce on other proteins?
This glaze works perfectly on baked chicken thighs, pork chops, or even tofu for a vegetarian option. For chicken thighs, reduce baking time to 35-40 minutes (until 165°F internal temp). For pork, use 400°F and bake for 25-30 minutes to avoid overcooking. The sauce's balance of sweet and smoky makes it versatile.
Why did my sauce turn out too thick?
This usually happens if simmered too long or if the honey-to-vinegar ratio was off. Thin with 1-2 teaspoons of warm water or apple cider vinegar while stirring. For next time, reduce simmering to 8-10 minutes instead of 12. If the sauce is too thin, simmer uncovered for 2-3 extra minutes to reduce it slightly.
Can I make this sauce ahead of time?
Yes! Make the sauce up to 3 days in advance and store it in an airtight container in the fridge. The flavors deepen over time, making it even more delicious. When ready to use, reheat gently on the stovetop over low heat for 3-5 minutes, stirring occasionally. For long-term storage, freeze in ice cube trays for single servings.