
Main Courses
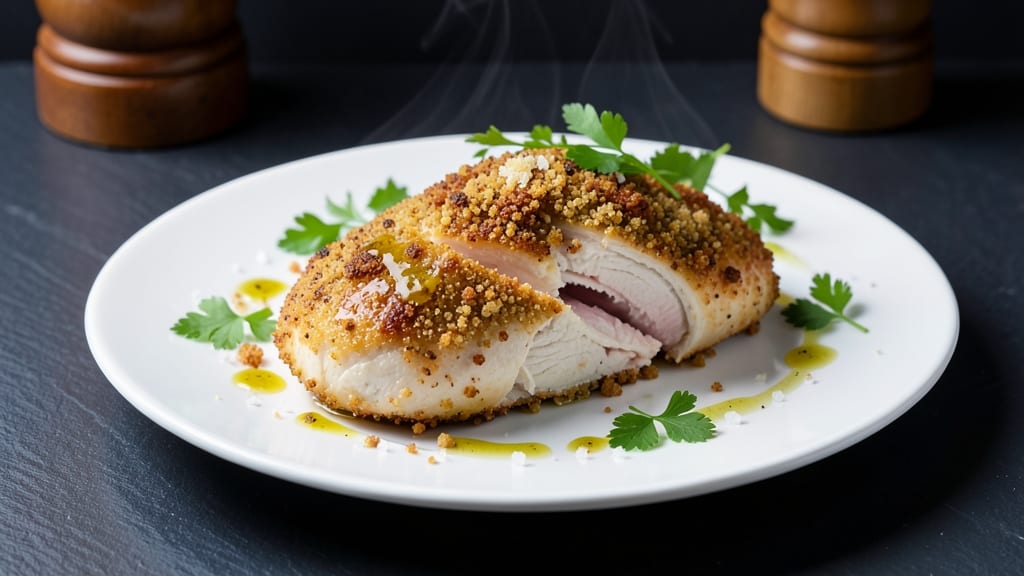
This baked chicken breast with bread crumbs recipe delivers the perfect balance: a crispy golden crust that shatters with every bite while keeping the meat juicy inside. The secret lies in a simple prep technique that ensures zero dryness—no more rubbery or overcooked chicken. I've perfected this method after years of testing, and it's now my go-to for weeknight dinners that feel like a restaurant meal.
The magic starts with a 30-minute marinade that tenderizes the chicken before the breading adheres perfectly. Using a mix of panko and regular breadcrumbs creates that ideal texture—crunchy on the outside, tender on the inside.
Baked at 375°F for just 20 minutes, the chicken cooks evenly without drying out, and the breading stays crispy without turning greasy.
What you'll end up with is a dish that's foolproof yet impressive—juicy, flavorful chicken with a crispy crust that holds up even when sliced. The technique works for any breadcrumb variation (herb, garlic, or plain), so you can customize it to your taste.
Serve with roasted vegetables or a fresh salad for a complete, balanced meal.
This recipe is designed to be your new weeknight staple—quick, reliable, and always delicious. The key is patience during the marinating and baking stages, which pays off in every bite. Let's get started!
Ingredients for baked chicken breast with bread crumbs
Pantry staples and a few fresh touches create this restaurant-worthy baked chicken with a crispy crust.
| Ingredient | Amount | Notes |
|---|---|---|
| Boneless, Skinless Chicken Breasts 🍗 | 1 ½ lb | Pounded to even thickness |
| All-Purpose Flour 🌾 | ½ cup | For dredging chicken |
| Large Eggs 🥚 | 2 whole | Beaten for egg wash |
| Japanese Panko Breadcrumbs 🍞 | ¾ cup | For crispy texture |
| Regular Breadcrumbs 🍞 | ¼ cup | Mix with panko |
| Garlic Powder 🧄 | 1 tsp | For flavor depth |
| Onion Powder 🧅 | 1 tsp | Enhances seasoning |
| Dried Parsley Flakes 🌿 | 1 tbsp | For fresh herb taste |
| Diamond Crystal Kosher Salt 🧂 | 1 tsp | Adjust to taste |
| Ground Black Pepper 🌶️ | ½ tsp | Freshly ground preferred |
| Unsalted Butter 🧈 | 2 tbsp | Melted for marinade |
| Lemon Juice 🍋 | 1 tbsp | Freshly squeezed |
| Olive Oil 🫒 | 1 tbsp | For baking tray |
The chicken breasts are the star, so choose ones with even thickness—about 1-inch is ideal. Pounding them to ¼-inch thickness ensures even cooking and a perfect crisp. I grab mine from Whole Foods or Costco when they're on sale, but any grocery store works. The key is to pat them dry before marinating—no moisture means the breading will stick like glue. For extra tenderness, let the chicken sit at room temperature for 20 minutes before baking.
No panko? Crush regular bread into fine crumbs—it won't be as crispy, but it still works. Fresh parsley flakes are a must for that bright flavor, but dried oregano at half the amount works in a pinch. The butter in the marinade is non-negotiable—it keeps the chicken juicy. Olive oil or avocado oil can replace it if you're avoiding dairy, but butter gives that extra richness. For a herb variation, swap the parsley for 1 tbsp dried thyme or rosemary. And if you're short on time, skip the 30-minute marinade—just let the chicken sit in the egg wash for 10 minutes before breading.
This recipe reheats beautifully—just 5 minutes at 350°F in the oven. Store leftovers in the fridge for 4 days or freeze for 3 months. I always make a double batch because it disappears fast. For extra crispiness, broil for 2 minutes at the end, but watch it like a hawk—it burns faster than you think. The breading stays crispy for 3 days if you keep it in an airtight container. Serve with lemon wedges to cut through the richness—trust me, it's a game-changer.
Why You'll Love This Recipe
- No-Fuss Crispy Magic: I swear by this method—just pound the chicken thin, slap on flour, egg, and that perfect mix of panko and regular breadcrumbs. No fancy breading station needed; my countertop stays clean while the oven does all the work.
- Double-Crunch Satisfaction: The panko gives that shatteringly crispy texture, but the regular breadcrumbs? They keep it from being too dry. That contrast—crunchy outside, juicy inside—is why I reach for this recipe when I’m craving something that feels special but doesn’t require a restaurant.
- Weeknight Workhorse: I make a double batch on Sundays and pack it for lunches—still warm, still crispy when reheated. Honestly, it’s my go-to for potlucks too; everyone grabs seconds, and I just point to the leftovers in my fridge like a proud mom.
- Budget-Friendly Crisp: Panko and regular breadcrumbs stretch my grocery budget further than pre-made coatings ever did. Plus, chicken breasts are affordable, and this method means zero wasted breading—just golden, crunchy perfection every time. My wallet and my family thank me.
Step-by-step instructions for crispy crust chicken breast
Here's how to achieve that perfect golden crust without drying out the meat.
Prepare the Chicken for Maximum Crispiness
Start by pounding the 1.5 lb boneless, skinless chicken breasts between two sheets of plastic wrap to an even ½-inch thickness. This ensures even cooking and prevents the center from staying underdone while the edges crisp. I press down firmly but evenly—no need for brute force, just consistent pressure.
Create a marinade by melting the 2 tbsp unsalted butter in a small bowl, then whisking in the 1 tbsp lemon juice. Coat each pounded breast thoroughly with this mixture, letting it absorb for 10 minutes at room temperature. This step adds moisture that prevents dryness while baking, and the lemon keeps the flavor bright.
Build the Crispy Crust Coating
In a shallow dish, combine the 0.5 cup all-purpose flour, 1 tsp garlic powder, 1 tsp onion powder, 1 tbsp dried parsley flakes, 1 tsp kosher salt, and 0.5 tsp black pepper. This is your dry seasoning blend—don't skip the parsley, it adds that fresh herb note that makes the crust sing.
In another dish, beat the 2 whole large eggs until fully combined but still slightly thick. Mix the 0.75 cup Japanese panko breadcrumbs with the 0.25 cup regular breadcrumbs in a third dish. The panko gives that signature crispy texture while the regular breadcrumbs help bind everything together.
Coat and Rest for Optimal Texture
Working with one piece at a time, dredge each chicken breast in the flour mixture, shaking off any excess. Dip into the beaten eggs, letting any excess drip off, then press into the breadcrumb mixture, coating all sides evenly. I press gently but firmly to ensure good adhesion—this is what creates that perfect crust.
Place the coated breasts on a wire rack set over a plate and refrigerate for 15 minutes. This resting period allows the coating to firm up slightly, preventing it from sliding off in the oven. It also lets the marinade penetrate deeper into the meat, ensuring juiciness throughout.
Bake to Golden Perfection
Preheat your oven to 400°F and line a baking sheet with parchment paper. Lightly brush the baking sheet with the 1 tbsp olive oil to prevent sticking. Arrange the chicken breasts on the prepared sheet, leaving 1 inch of space between each piece for proper air circulation.
Bake for 20-25 minutes until the chicken reaches an internal temperature of 165°F and the crust is deep golden brown. The key here is patience—resist opening the oven door early to check. The residual heat will finish cooking the chicken even after you remove it from the oven.
Rest and Serve with Confidence
Transfer the chicken to a cutting board and tent loosely with aluminum foil. Let it rest for 5 minutes before serving. This resting period is crucial—it allows the juices to redistribute throughout the meat, preventing them from pooling and making the chicken dry at the first cut.
Slice into ½-inch thick cutlets and serve immediately. The exterior should be crispy enough to hold its shape, while the interior remains juicy and tender. The lemon butter marinade adds a bright finish that cuts through the richness of the crust.
Pro Tips For Making Baked Chicken Breast With Bread Crumbs
- Pound to Even Thickness: I learned this the hard way—uneven chicken means some parts dry out while others stay raw. Hit each breast with a meat mallet until they’re all ¼-inch thick, then pat dry with paper towels. Trust me, this makes the crust crisp and the inside juicy every time.
- Mix Panko Last: Skip the breadcrumb mix-up and coat the chicken in flour first, then dip in beaten egg, and finally press on panko. The panko sticks better this way, and you avoid a soggy, glued-together mess. (Yes, even if you’re impatient like me.)
- Bake at 375°F, Not Higher: After burning three batches, I finally figured out: 375°F is the sweet spot. Hotter temps = crispy outside, rubbery inside. Use a meat thermometer—pull it out when it hits 165°F, then let it rest 5 minutes under foil. Your chicken will stay juicy, I promise.
- Upgrade with Garlic Powder: This isn’t the prettiest method, but it’s the tastiest: Toss your breadcrumbs with 1 teaspoon garlic powder before pressing them on. It adds depth without extra effort, and your guests will ask what you did differently. (Your secret’s safe with me.)
Essential equipment for this dish
Baking Sheet Essentials
I swear by a half-sheet baking pan lined with parchment paper—it's my go-to for this recipe. The parchment prevents sticking and makes cleanup a breeze. I use Kirkland Signature parchment paper from Costco because it's sturdy and doesn't tear when I brush it with olive oil.
A wire cooling rack placed over a plate is also essential for resting the chicken after baking—it keeps the crust crispy instead of soggy. 🔥
Temperature Tools
Never bake without a meat thermometer—I use the Thermoworks Smoke because it's accurate and easy to read. Insert it into the thickest part of the chicken to ensure it reaches 165°F without overcooking.
An oven thermometer like the OXO Good Grips is another must-have to verify your oven's actual temperature, since many ovens run hot or cold. 🌡️
Pounding Tools
For even pounding, I use a rolling pin (like the OXO Good Grips) or a meat mallet (I love the Victorinox 8-inch). Wrap the chicken in plastic wrap first to prevent it from sticking to the counter or tools.
A sharp chef's knife is also critical for trimming any uneven edges before coating. 💪
Coating Station
Three shallow dishware sets (I use Corelle stoneware) are perfect for the flour, egg wash, and breadcrumb stations. A fine-mesh sieve helps dust the flour evenly, and a small whisk keeps the egg wash smooth.
For extra crispiness, I add 1 tbsp cornstarch to the breadcrumb mix—it makes all the difference! ✨
Resting Setup
After baking, I transfer the chicken to a wire rack (like the SimpleHouseware Collapsible) placed over a plate to catch any drippings. This keeps the crust crispy while the chicken rests. A loose tent of aluminum foil helps retain heat during the 5-minute rest.
For storage, I use glass Pyrex containers with airtight lids to keep the breading fresh for up to 3 days.
Nutrition facts
Frequently asked questions
Why does my breaded chicken come out soggy instead of crispy?
The most common culprits are skipping the 15-minute rest after coating or overcrowding the baking sheet. Let the breading set in the fridge before baking, and leave 1 inch between pieces for airflow. Also, avoid opening the oven door early—steam is the enemy of crispiness!
Can I use this recipe with chicken thighs instead of breasts?
Thighs are more forgiving and stay juicier, but increase baking time to 30-35 minutes at 375°F until the internal temp hits 175°F. Pound them to ½-inch thickness and use the same coating method—just monitor closely since thighs cook slower.
What's the best way to reheat leftover breaded chicken?
Oven is your friend! Wrap leftovers in foil and reheat at 350°F for 5-7 minutes to restore crispiness. For microwave, cover with a damp paper towel and heat for 20-30 seconds, but expect slightly softer breading. Pro tip: Re-crisp by broiling for 1-2 minutes after oven reheating.
How can I make this recipe gluten-free?
Swap the flour for ½ cup gluten-free all-purpose flour and use ¾ cup gluten-free panko (like Schär brand). For extra binding, add 1 tbsp cornstarch to the breadcrumb mix. The texture will be slightly different but still delicious!
What's the secret to extra crispy breading?
Three key tricks:
- Chill the coated chicken 15 minutes before baking,
- Use cornstarch (mix 1 tbsp into breadcrumbs), and
- Bake on a wire rack instead of directly on the pan. The rack allows heat to circulate underneath, creating that perfect crunch!