
Main Courses
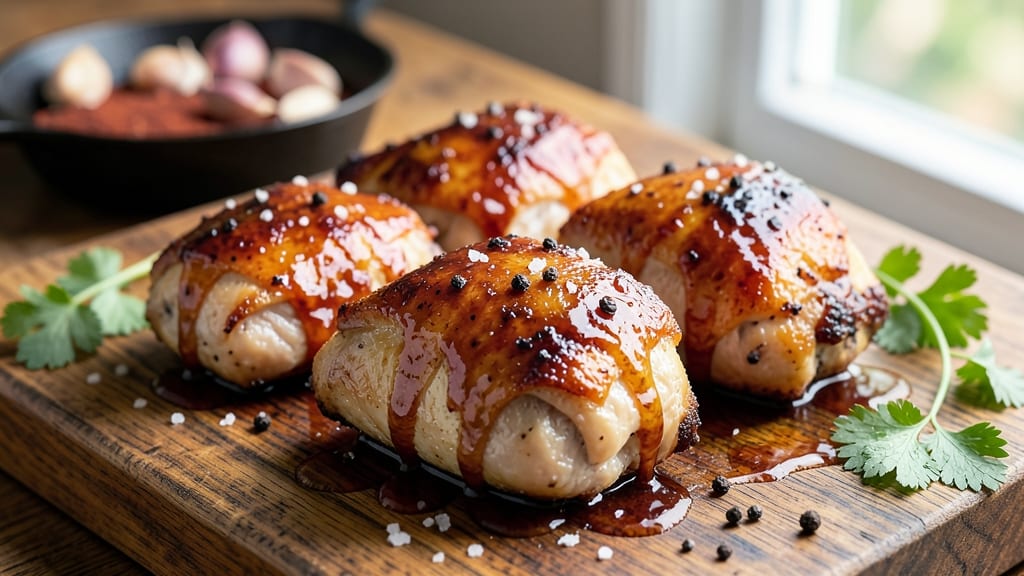
This baked BBQ chicken quarters recipe delivers finger-licking, crunchy-bite perfection with a smoky-sweet glaze that caramelizes to golden perfection. 🔥 The secret lies in high-heat baking that transforms tender chicken into crispy, fall-off-the-bone pieces while developing deep BBQ flavors without the smoker.
I've perfected this method over countless summer cookouts, where it becomes the star of every spread.
The process combines two essential techniques: a dry rub for flavor penetration and a basting glaze that creates that coveted caramelized crust. You'll bake the chicken at 425°F for 35-40 minutes, basting every 10 minutes to ensure even browning and maximum flavor development.
This isn't just another BBQ recipe—it's a foolproof method that delivers restaurant-quality results with minimal effort.
What you'll end up with is chicken quarters with crispy, caramelized edges that shatter when you bite in, while the meat inside remains juicy and tender. The glaze develops a sticky-sweet crust that clings perfectly, offering that perfect balance of smoky, tangy, and slightly sweet flavors.
Each piece comes out with that signature BBQ bark that makes it impossible to resist.
Serve these with classic sides like creamy coleslaw or buttery cornbread to complete the meal. The beauty of this recipe is its versatility—it works equally well for casual weeknight dinners or impressive gatherings. Here's everything you need to create this crowd-pleasing dish!
Ingredients for baked bbq chicken quarters
Six pieces of chicken transformed into restaurant-quality BBQ perfection with just these 14 ingredients.
| Ingredient | Amount | Notes |
|---|---|---|
| Chicken Quarters 🍗 | 6 pieces | Bone-in, skin-on preferred |
| Kosher Salt 🧂 | 1 ½ tbsp | Diamond Crystal preferred |
| Black Peppercorns 🌶️ | 1 tbsp | Freshly cracked preferred |
| Smoked Paprika 🌶️ | 1 ½ tbsp | High-quality for smoky depth |
| Garlic Powder 🧄 | 1 tbsp | Freshly ground preferred |
| Onion Powder 🧅 | 1 tbsp | For balanced flavor |
| Brown Sugar 🍯 | ½ cup | Light or dark preferred |
| Apple Cider Vinegar 🍏 | ¼ cup | For tangy depth |
| Tomato Paste 🍅 | ¼ cup | High-quality preferred |
| Yellow Mustard 🟡 | 2 tbsp | For glaze binding |
| Honey 🍯 | ¼ cup | For caramelization |
| Extra-Virgin Olive Oil 🫒 | 2 tbsp | For basting glaze |
| Fresh Rosemary 🌿 | ¼ cup | Chopped, for aroma |
| Fresh Thyme 🌿 | ¼ cup | Chopped, for herbal notes |
The chicken quarters make all the difference here—bone-in and skin-on delivers that signature crispy texture and juicy interior. Trader Joe's and Costco often carry pre-cut quarters, but if you're buying whole chickens, ask the butcher to cut them into quarters. For the dry rub, Penzeys or bulk bins at natural markets offer the highest quality spices. Freshly cracked peppercorns and freshly chopped herbs elevate the flavor profile significantly—don't skip this step. The brown sugar should be light for a balanced sweetness, but dark works if you prefer deeper caramel notes.
No smoked paprika? Regular paprika plus a pinch of liquid smoke gets you close. Substituting honey? Maple syrup works 1:1, though it has a slightly different flavor profile. The apple cider vinegar adds tang—if you only have white vinegar, use half the amount. For the tomato paste, San Marzano is ideal, but any high-quality brand works. If you're avoiding honey, agave nectar at the same ratio maintains the glaze's caramelization. The fresh herbs can be swapped for dried at one-third the amount, but they won't have the same aromatic impact.
Prep the chicken quarters the night before—pat them dry and refrigerate uncovered to remove excess moisture. The dry rub can be made a week ahead and stored in an airtight container. The glaze ingredients should be mixed just before basting to prevent separation. These pieces reheat beautifully—simply bake at 350°F for 15-20 minutes until warmed through. Store leftovers in the fridge for 4-5 days, or freeze for 3 months. The glaze thickens when chilled, so a quick reheat with a splash of water restores its consistency.
Why You'll Love This Recipe
- No-Fuss Prep: I swear by this recipe because it’s the kind of meal that lets you not stress. Just toss those chicken quarters with salt, pepper, paprika, and garlic powder—no brining, no marinating overnight, no fussing with sauces. Honestly, it’s the kind of simplicity that makes me want to cook more often.
- Smoky, Savory Magic: That smoked paprika and garlic powder combo? It’s where the real flavor lives. The chicken gets this crispy, golden edge while staying juicy inside, and the spices cling like they’ve been slow-cooked all day—even though it’s just 45 minutes in the oven. Between us, it’s the kind of taste that makes people ask, “What’d you do to these?”
- Game for Any Gathering: Whether it’s a lazy Sunday brunch, a tailgate spread, or just feeding the kids after soccer practice, these quarters deliver. Serve them with store-bought buns for sliders, shred them into tacos, or let everyone dig in with their hands—no judgment here. (Yes, even on a Tuesday night.)
- Leftovers That Don’t Suck: I make a double batch because the leftovers are chef’s kiss. Cold quarters in a sandwich? Still amazing. Reheated with a splash of BBQ sauce? Even better. And since chicken quarters are cheaper than breasts, you’re getting more bang for your buck without sacrificing flavor. My wallet and my taste buds thank me every time.
Step-by-step instructions for baked BBQ chicken quarters
Transform simple chicken quarters into restaurant-quality BBQ with this foolproof baking method.
👨🍳 Step 1: Prepare the Dry Rub and Glaze
In a medium bowl, combine the 1.5 tbsp smoked paprika, 1 tbsp garlic powder, 1 tbsp onion powder, 1 tbsp freshly cracked black peppercorns, and 1.5 tbsp kosher salt. Mix thoroughly until the spices are evenly distributed and the salt is fully incorporated into the dry blend. This aromatic mixture will penetrate the chicken, creating deep flavor in every bite.
In a separate bowl, whisk together the 0.5 cup brown sugar, 0.25 cup apple cider vinegar, 0.25 cup tomato paste, 2 tbsp yellow mustard, 0.25 cup honey, and 2 tbsp extra-virgin olive oil. The mustard acts as a binder while the vinegar adds tangy brightness. Set both the dry rub and glaze mixtures aside—they'll be used in the next steps.
🍳 Step 2: Season and Sear the Chicken
Preheat your oven to 425°F with the rack positioned in the middle position. Pat the 6 pieces chicken quarters dry with paper towels—this ensures maximum crispiness when they bake. Generously coat each quarter with the dry rub mixture, pressing it firmly into the skin and crevices. The skin should look uniformly dusted with the spice blend.
Heat a large oven-safe skillet over medium-high heat and add the chicken quarters skin-side down. Let them sear undisturbed for 4-5 minutes until the skin develops a deep golden-brown crust. Flip each piece carefully and sear the other side for another 3-4 minutes. This initial searing locks in juices and creates that coveted caramelized exterior.
🥘 Step 3: Bake with Glaze for Perfect Caramelization
Transfer the seared chicken quarters to a baking sheet lined with parchment paper. Pour the prepared glaze mixture evenly over the chicken, ensuring each piece is thoroughly coated. The glaze should pool slightly in the bottom of the pan—this will create a sticky, caramelized crust during baking.
Bake in the preheated 425°F oven for 30 minutes, then reduce the heat to 375°F and continue baking for another 25-30 minutes. You'll know it's done when the internal temperature reaches 175°F (measured in the thickest part of the meat) and the glaze has thickened into a glossy, sticky coating with a deep caramelized crust that's almost crispy to the touch.
⏰ Step 4: Rest and Garnish for Optimal Texture
Remove the chicken from the oven and transfer it to a cutting board. Let it rest for 10 minutes before serving—this crucial step allows the juices to redistribute throughout the meat. While resting, sprinkle the 0.25 cup chopped fresh rosemary and 0.25 cup chopped fresh thyme evenly over the top. The herbs will release their aromatic oils, adding a final layer of complexity to the dish.
The resting period also ensures the caramelized glaze sets properly, creating that perfect balance between sticky and slightly crispy. Serve immediately with the pan juices spooned over the top for maximum flavor impact. Each bite should deliver tender meat with a dual-texture glaze that's both sweet and tangy, finished with herbal brightness.
Pro Tips For Making Baked Bbq Chicken Quarters
- CRANK THE HEAT FIRST: Start your chicken quarters at 425°F (220°C) for the first 20 minutes—this gets the skin crisping fast before the meat cooks through. After that, drop to 375°F (190°C) to finish without drying them out. I used to bake at a steady 350°F and always ended up with sad, rubbery skin.
- SALT THE CHICKEN BEFORE YOU TOUCH IT: Pat the quarters dry with paper towels, then season generously with kosher salt and black pepper before adding any dry rubs or BBQ sauce. The salt draws out moisture, which means the paprika and garlic powder will stick better and the skin will crisp up like it’s supposed to. (Yes, even if you’re impatient like me.)
- DON’T SKIP THE REST: Let the chicken quarters sit on a wire rack for 5–10 minutes after baking—this keeps them from steaming back to soggy. If you’re in a rush, at least transfer them to a cutting board and tent loosely with foil for 3 minutes. Trust me, the difference in texture is night and day.
- BRINE THEM IF YOU’RE SHORT ON TIME: For extra juicy quarters, soak them in cold water with 1 tablespoon kosher salt per quart for 30 minutes before baking. No time? At least sprinkle the salt underneath the skin before seasoning—it’ll make the meat tender without the full brine effort. (Your future self will thank you.)
Storing and reheating this baked bbq chicken quarters
Refrigerator Storage
Store your leftover BBQ chicken quarters in an airtight container for up to 4-5 days—the glaze actually improves overnight as it thickens slightly. I use glass Pyrex containers because they prevent odors from seeping in.
Before storing, let the chicken cool to room temperature (about 1 hour), then refrigerate. The skin stays crispy longer when stored this way, and the flavors meld beautifully. 💫
Freezer Prep Tips
For longer storage, freeze the chicken quarters in a single layer on a baking sheet for 1 hour to prevent sticking, then transfer to freezer bags with all air removed. Label with the date—these keep for 3 months without losing quality.
Thaw overnight in the fridge before reheating. The glaze may thicken slightly when frozen, so add 1 tsp water when reheating to restore consistency. 🥶
Oven Reheating Method
My preferred reheating technique is 350°F for 15-20 minutes—this preserves the crispy skin and caramelized glaze. Place the chicken on a baking sheet with 1 tbsp water in the pan to create steam.
Cover loosely with foil for the first 10 minutes, then uncover to crisp the skin again. The internal temperature should reach 165°F for safe consumption. 🔥
Air Fryer Refresh
For a quicker option, use an air fryer at 350°F for 8-10 minutes, shaking the basket halfway. This method works best if you reheat the chicken while still slightly chilled.
The air fryer recrisps the skin beautifully while keeping the meat juicy. I find this works especially well for 2-3 pieces at a time to avoid overcrowding. ✨
Glaze Restoration
If the glaze looks dry after storage, simply reheat it with 1-2 tsp water or apple cider vinegar in a small saucepan over low heat. Stir until smooth and glossy—this revives the sticky, caramelized texture.
For extra shine, add ½ tsp honey while reheating. The restored glaze will cling perfectly to the chicken when served. 🍯
Serving Leftovers
Leftovers make fantastic BBQ chicken sandwiches—pile the warm chicken on toasted brioche buns with coleslaw and a drizzle of extra glaze. For a hearty meal, serve with mashed potatoes or cornbread.
The reheated chicken holds its texture well, making it perfect for meal prep. I always save a few pieces to enjoy cold in salads the next day. 🥪
Nutrition facts
Frequently asked questions
Can I use bone-in, skin-on chicken thighs instead of quarters?
Chicken thighs work beautifully for this recipe. The bone-in, skin-on pieces will develop even more flavor and crispiness. Adjust cooking time to 45-50 minutes at 425°F since thighs are thicker. The glaze will cling perfectly to the skin, creating that signature caramelized bark.
How do I prevent the glaze from burning during baking?
Baste the chicken every 10 minutes during baking to distribute the glaze evenly. Reduce oven temperature to 375°F after the first 30 minutes to prevent over-browning. If the glaze starts to darken too quickly, tent the pan loosely with foil until it thickens properly.
Can I make this recipe in an air fryer instead of the oven?
Yes! Preheat the air fryer to 400°F and cook for 20-25 minutes, shaking halfway. For extra crispiness, spray with 1 tsp olive oil before air frying. The air fryer method works best for 2-3 pieces at a time to avoid overcrowding, which can make the skin soggy.
Why is my chicken dry even though I followed the recipe?
Overcooking is the most common cause. Use a meat thermometer to check the internal temperature—175°F is perfect for juicy quarters. Another tip: Pat the chicken very dry before seasoning, and don't skip the resting period. If the chicken still seems dry, try brining it for 30 minutes in ¼ cup salt per quart of water before cooking.
Can I prepare the dry rub and glaze ahead of time?
Yes! The dry rub can be stored in an airtight container for up to 1 week, and the glaze ingredients can be mixed 1 day ahead (store in the fridge). Just whisk the glaze well before using to restore consistency. For best results, use fresh herbs when garnishing before serving to maximize flavor.