
Main Courses
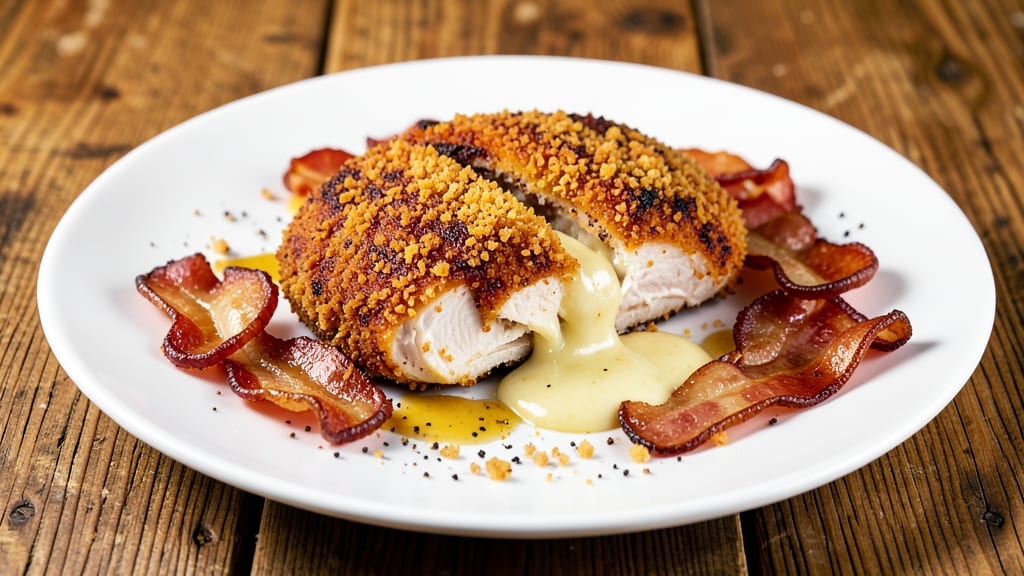
Bacon-crusted cheese-stuffed chicken breast transforms ordinary weeknight dinners into a restaurant-worthy experience with every bite. The secret lies in the triple-layered texture—crispy bacon edges, creamy melted cheese, and tender chicken that never dries out. I perfected this technique after years of testing, and the results are so impressive that even skeptical meat lovers ask for seconds.
This recipe balances smoky bacon flavors with rich cheddar, creating a harmonious blend that's both indulgent and satisfying. The process is straightforward: you'll sear the chicken to lock in juices, stuff it with a blend of sharp cheddar and crumbled bacon, then bake until golden and perfectly cooked through.
No special equipment is needed—just a few simple ingredients and about 30 minutes of active time.
The outcome is a chicken breast with a crispy, bacon-encrusted exterior that gives way to gooey melted cheese inside, all wrapped around tender, juicy chicken. The combination of textures and flavors makes this dish feel luxurious without requiring advanced skills.
It's the kind of recipe that elevates simple weeknight meals into something special.
Serve with roasted vegetables or a fresh salad to complete the meal, or pair it with mashed potatoes for a comforting classic. The leftovers reheat beautifully, making this an ideal recipe for meal prep. Let's get started on creating this crowd-pleasing dish!
Ingredients for bacon and cheese chicken breast
Pantry staples meet premium proteins for this triple-layered chicken masterpiece.
| Ingredient | Amount | Notes |
|---|---|---|
| Boneless, Skinless Chicken Breast 🍗 | 1 ½ lb | Pounded to even thickness |
| Center-Cut Bacon 🥓 | ½ lb | Thinly sliced, not pre-cooked |
| Sharp White Cheddar Cheese 🧀 | 8 oz | Block form, freshly grated |
| All-Purpose Flour 🌾 | ½ cup | For dredging chicken |
| Large Eggs 🥚 | 2 whole | Beaten for egg wash |
| Panko Breadcrumbs 🍞 | ½ cup | For extra crunch |
| Unsalted Butter 🧈 | 2 tbsp | For searing chicken |
| Diamond Crystal Kosher Salt 🧂 | 1 ½ tsp | For seasoning |
| Freshly Ground Black Pepper 🌶️ | 1 tsp | For seasoning |
| Garlic Powder 🧄 | ½ tsp | For flavor depth |
| Onion Powder 🧅 | ½ tsp | For savory balance |
| Extra-Virgin Olive Oil 🫒 | 1 tbsp | For baking tray |
The chicken breast quality determines success—look for uniform thickness and minimal fat marbling. Oscar Mayer or Hillshire Farm center-cut bacon delivers the best texture when thinly sliced. For the cheddar, Cabot or Tillamook sharp cheddar offers that perfect balance of tang and creaminess. Panko breadcrumbs add an extra layer of crunch that regular breadcrumbs can't match. I always buy bacon in bulk from Costco—it's cheaper and stays fresher longer in the freezer. The kosher salt matters here; Diamond Crystal dissolves more easily than table salt, so you get better flavor distribution.
No center-cut bacon? Thick-cut bacon works too—just slice it thinner. Short on sharp cheddar? Pepper jack or Gouda add different but equally delicious flavors. For the flour, King Arthur or Bob's Red Mill brands stay clump-free when dredging. Egg wash can be skipped if you're in a rush, but it creates that golden finish. The garlic and onion powders are non-negotiable for depth—McCormick or Badia are reliable brands. Need to prep ahead? Slice the bacon and grate the cheese up to a day in advance, then store in the fridge until ready to use.
This dish reheats beautifully—just 5 minutes at 350°F wrapped in foil. The bacon crust stays crispy, and the cheese remains gooey. Store leftovers in an airtight container for up to 4 days or freeze for 3 months. I always make a double batch because it disappears faster than I can say 'triple-layered texture.' For meal prep, portion the stuffed breasts into individual containers before baking—just add the bacon crust fresh out of the oven when serving to keep it crisp.
Why You'll Love This Recipe
- No-Fuss Weeknight Win: I swear by this for days I’d rather binge Netflix than cook. Three ingredients do the heavy lifting—crispy bacon, sharp cheddar, and that golden flour crust—and it’s all hands-off after the initial sear.
- Crispy-Creamy Magic: That first bite? Crunchy bacon crumbles, melty cheddar stretches, and the chicken stays juicy inside. Honestly, it’s the kind of flavor combo that makes you question why you ever ate plain chicken.
- Lunchbox Hero: Between us, this is my go-to for meal prep. Slice the cooled chicken, pack it with crackers or greens, and it holds up like a champ. My kids actually eat their leftovers—no questions asked.
- Budget-Friendly Luxury: Sharp cheddar and center-cut bacon might sound fancy, but they stretch further than you’d think. A single pan, minimal ingredients, and you’ve got a protein-packed meal that feels indulgent without breaking the bank.
Step-by-step instructions for bacon-crusted cheese-stuffed chicken breast
Master this technique for restaurant-quality chicken with a triple-layered texture that delivers crispy bacon, creamy cheese, and golden breading.
Prepare the Chicken and Create the Stuffing
Begin by pounding the 1.5 lb boneless, skinless chicken breast between two sheets of plastic wrap to an even ½-inch thickness using a meat mallet. This ensures even cooking and prevents dryness. Season both sides generously with 1.5 tsp Diamond Crystal kosher salt, 1 tsp freshly ground black pepper, 0.5 tsp garlic powder, and 0.5 tsp onion powder, pressing the spices into the meat so they adhere well.
Next, create the cheese stuffing by grating 8 oz sharp white cheddar cheese using a box grater or food processor. The cheese should be finely grated to ensure it melts smoothly and distributes evenly. Fold the grated cheese into the center of each chicken breast, creating a log shape. Secure the cheese inside by tying each breast tightly with kitchen twine, which prevents the filling from leaking during cooking.
Create the Bacon Crust and Dredge the Chicken
Cook the 0.5 lb center-cut bacon in a cold skillet over medium-low heat for 8-10 minutes, stirring occasionally, until it renders ½ of its fat and becomes crispy. Remove the bacon from the skillet, leaving the fat behind, and drain it on a paper towel-lined plate. Once cooled slightly, crumble the bacon into coarse pieces and set aside.
In a shallow bowl, combine 0.5 cup all-purpose flour, 0.5 cup panko breadcrumbs, and the crumbled bacon. Dredge each stuffed chicken breast in the flour mixture, pressing gently to ensure the coating adheres evenly. This triple-layered crust will create the signature crunch and texture. Place the dredged chicken on a wire rack set over a plate to allow any excess coating to fall off.
Sear the Chicken for Maximum Flavor
Heat 2 tbsp unsalted butter in a large skillet over medium-high heat until it foams but doesn’t brown. Add the dredged chicken breasts and cook for 3-4 minutes per side, pressing down gently with a spatula during the first minute to ensure even contact with the pan. This prevents curling and guarantees a golden-brown crust. The chicken is ready to flip when it releases easily from the pan and the coating turns a deep golden color.
Once seared on both sides, reduce the heat to medium and continue cooking for an additional 2-3 minutes until the internal temperature reaches 155°F at the thickest part of the breast. This ensures the chicken is fully cooked while maintaining juiciness. Transfer the chicken to a plate and tent loosely with foil to keep warm while you prepare the final touches.
Finish with an Egg Wash and Bake to Perfection
In a small bowl, beat the 2 whole large eggs until just combined. Brush the beaten eggs generously over the seared chicken breasts, ensuring the entire surface is coated. This step adds a glossy finish and helps the crust set during baking. Place the chicken on a baking sheet lined with parchment paper and drizzle 1 tbsp extra-virgin olive oil evenly around the chicken to promote browning.
Bake in a preheated 375°F oven for 12-15 minutes, or until the internal temperature reaches 165°F and the crust is deeply golden and crispy. The cheese inside should be fully melted, creating a creamy center that contrasts beautifully with the crunchy exterior. Remove the chicken from the oven and let it rest for 5 minutes before slicing to allow the juices to redistribute.
Serve with Confidence
Slice the chicken breasts horizontally into ½-inch thick medallions, ensuring the cheese stays contained within each piece. Serve immediately with your choice of sides, such as a fresh green salad or roasted vegetables. The combination of crispy bacon, golden breading, and melted cheddar creates a harmonious balance of textures and flavors that will impress even the most discerning diners.
This technique delivers a restaurant-worthy result with a triple-layered texture that’s crispy on the outside, creamy in the middle, and juicy throughout. The key to success lies in the precise timing of searing and baking, as well as the careful layering of flavors and textures. Enjoy your perfectly executed bacon-crusted cheese-stuffed chicken breast!
Pro Tips For Making Bacon And Cheese Chicken Breast
- Pound Chicken Evenly: Skip the guesswork—use a meat mallet or rolling pin to tap each breast to ¼-inch thickness. Uneven pounding means some bites will be rubbery while others dry out; consistency is everything here.
- Crisp Bacon First: Cook the bacon in the same pan you’ll use for the chicken—no need to wash it out. The rendered fat will add flavor, and you’ll save a dish later. Just blot the pan dry with a paper towel first to avoid steam.
- Don’t Overstuff Cheese: Sharp cheddar melts fast, so fill the chicken pockets loosely—about 1 ounce per breast. Too much cheese oozes out during frying, and you’ll end up with a soggy crust instead of a gooey center.
- Rest Chicken After Dredging: Let the floured and egg-washed breasts sit on a wire rack for 3–5 minutes before frying. This prevents the batter from sliding off when you flip, and the crust stays crispier longer—trust me, it’s worth the wait.
Common mistakes when making this dish
Overstuffing the Chicken
Don't overstuff the chicken breasts with cheese—this is a common mistake that leads to messy leaks during cooking. I've seen people cram in too much filling, causing it to spill out when you slice into the finished dish.
Instead, use just 8 oz of cheese for 1.5 lbs of chicken, and fold it neatly into the center without overpacking. The cheese should melt beautifully without overflowing. 🧀
Skipping the Twine
If you skip tying the stuffed chicken with kitchen twine, you risk the cheese filling oozing out during cooking. I learned this the hard way when my first attempt left melted cheese dripping onto the baking sheet.
Secure each breast tightly with twine before dredging and cooking. This keeps everything contained and ensures clean slices when serving.
Uneven Pounding
Pounding the chicken breast unevenly leads to inconsistent cooking—some parts will be overdone while others remain undercooked. Use a meat mallet to pound the breast to an even ½-inch thickness between two sheets of plastic wrap.
Check thickness with a ruler to ensure uniformity. This step is crucial for juicy, perfectly cooked chicken every time. 🍗
Insufficient Searing
Rushing the searing step results in a pale, flavorless crust instead of the rich, golden-brown exterior we want. Sear each side for 3-4 minutes over medium-high heat until the coating turns deep golden.
Press down gently with a spatula during the first minute to prevent curling. This step builds flavor and texture that baking alone can't achieve.
Overcooking in Oven
Leaving the chicken in the oven too long turns the bacon crust soggy and the chicken dry. Remove it when the internal temperature hits 165°F—no higher! I've seen people bake until the crust is extra crispy, only to find the chicken dry.
The 5-minute rest after baking is crucial for redistributing juices. Use a meat thermometer for precision.
Wrong Cheese Texture
Pre-shredded cheese contains anti-caking agents that prevent proper melting, leading to a grainy texture in your finished dish. Always use freshly grated sharp white cheddar for the best results.
A box grater or food processor works best. This simple swap makes all the difference in achieving that creamy, melt-in-your-mouth center. 🧀
Nutrition facts
Frequently asked questions
Can I use ground bacon instead of sliced bacon for the crust?
Ground bacon won't work for this recipe—it lacks the crispy texture and flavor profile needed for the perfect crust. Instead, use thinly sliced center-cut bacon that renders fat beautifully while maintaining structure. If you're short on time, pre-cook the bacon until crispy and crumble it coarsely for the coating.
What's the best cheese substitute if I don't have sharp cheddar?
Pepper jack adds a subtle kick, while Gouda offers a nutty depth that works beautifully. Avoid mild cheddar—it won't melt as smoothly. For extra richness, try a blend of sharp cheddar and Gruyère. Always grate fresh rather than using pre-shredded cheese to prevent graininess in the final dish.
How do I keep the chicken from drying out during baking?
Start with evenly pounded ½-inch thick breasts and never exceed 165°F internal temperature. The searing step locks in juices, and the 5-minute rest after baking lets them redistribute. For extra moisture, brush the chicken with a thin layer of melted butter before the egg wash.
Can I make this recipe in an air fryer instead of oven?
Yes! After searing, place the chicken in the air fryer at 375°F for 8-10 minutes, flipping halfway. The air fryer creates a crispier crust than the oven, but monitor closely to avoid overcooking. Reduce temperature to 350°F if your air fryer runs hot.
How should I store leftovers to maintain texture?
Let the chicken cool completely, then store in an airtight container. Reheat in a 350°F oven for 5 minutes** wrapped in foil to preserve crispness. For the best results, reheat only what you'll serve immediately—microwaving makes the crust soggy.