
Main Courses
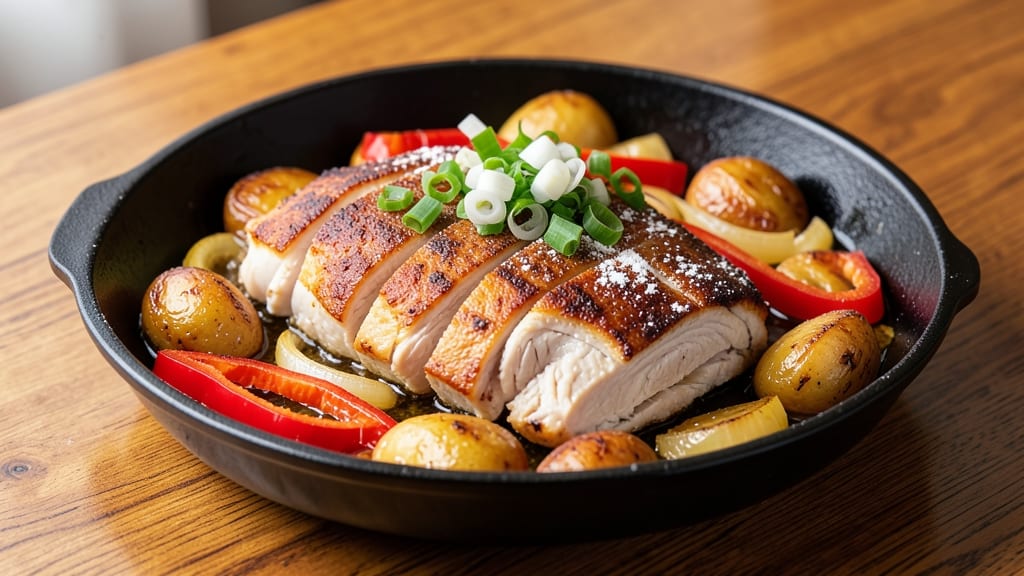
Applebee's Sizzling Chicken Skillet recipe delivers that perfect balance of crispy chicken, tender potatoes, and a blanket of melted cheese—just like the restaurant version. 🔥 The secret lies in the skillet technique, where high heat sears the chicken while the vegetables roast to perfection beneath a creamy, cheesy finish.
I've recreated this dish after countless attempts, and now it's time to bring that restaurant-quality flavor home.
This one-pan wonder combines juicy chicken breasts, crispy potatoes, and colorful bell peppers in a rich, cheesy sauce that ties everything together. The key is browning the chicken first for maximum flavor, then letting the vegetables roast until tender before adding the cheese blend.
It's a hands-off process that still delivers big on taste—ideal for a weeknight dinner that feels like a special occasion.
By the time you serve this dish, you'll have golden, crispy chicken with tender edges, perfectly roasted potatoes, and a creamy, cheesy sauce that makes every bite irresistible.
The aroma alone will have everyone gathering around the table, and the combination of textures—crispy, creamy, and tender—is what makes this skillet so addictive.
Serve it with a side of green onions or a dollop of sour cream for extra freshness, and don't forget the crusty bread to soak up every last bit of that delicious sauce.
This recipe is designed to impress, whether you're feeding a family or hosting a dinner party. Let's get cooking!
Ingredients for applebee's sizzling chicken skillet
Crispy chicken, tender potatoes, and a blanket of cheesy sauce—just like Applebee's.
| Ingredient | Amount | Notes |
|---|---|---|
| Boneless, Skinless Chicken Breasts 🍗 | 1 ½ lb | Cut into 1-inch strips for even cooking |
| Baby Potatoes 🥔 | 1 ½ lb | Halved, skin-on for texture |
| Red Bell Peppers 🍅 | 2 whole | Sliced into 1-inch strips |
| Yellow Onion 🧅 | 1 whole | Diced, medium size |
| Green Onions 🌿 | 3 whole | Sliced, for garnish |
| All-Purpose Flour 🌾 | ½ cup | For dredging chicken |
| Shredded Cheddar Cheese 🧀 | 2 cups | Sharp cheddar preferred |
| Cream Cheese 🧈 | 8 oz | Softened for smooth sauce |
| Sour Cream 🥛 | ½ cup | Full-fat for creaminess |
| Butter 🧈 | 3 tbsp | Unsalted, melted |
| Garlic Cloves 🧄 | 4 cloves | Minced for flavor |
| Salt 🧂 | 1 ½ tsp | Kosher or sea salt |
| Black Pepper 🌶️ | ½ tsp | Freshly ground preferred |
| Garlic Powder 🧄 | ½ tsp | For extra flavor |
| Onion Powder 🧅 | ½ tsp | Enhances onion flavor |
The chicken makes or breaks this dish. Buy bone-in, skin-on breasts if you can find them—the skin crisps up beautifully. Trader Joe's usually has great cuts, or check the butcher section at Kroger. If you're using boneless, skinless (like most grocery stores sell), pat them dry with paper towels before dredging—they'll crisp up better. The potatoes? Baby potatoes are ideal, but any small potatoes work. Halve them so they cook through without turning mushy. Skip the pre-washed bags—they're often waxed, which can make them gummy.
No sharp cheddar? Monterey Jack or a blend of cheddar and mozzarella works too. Cream cheese too expensive? Substitute sour cream at double the amount—it won't be as smooth, but still delicious. Short on green onions? Fresh chives or parsley add color. The garlic? Fresh is non-negotiable here—jarred garlic tastes like soap. If you're feeling fancy, roast the garlic cloves for 10 minutes at 400°F before mincing. The flour is just for dredging—no need to go fancy here. The Diamond Crystal kosher salt is my go-to, but any kosher salt works.
This skillet reheats like a dream—honestly tastes better the next day. Store leftovers in an airtight container for up to 4 days. Freezes beautifully for 3 months if you want to make a double batch. I always make extra because it disappears fast. For serving, warm the bread in the oven for 5 minutes—it soaks up the sauce perfectly. That crispy chicken skin? Eat it. It's the best part.
Why You'll Love This Recipe
- One-Pan Magic: I swear by this for lazy nights—just toss everything on a sheet pan, pop it in the oven, and walk away. Baby potatoes and chicken cook together, so no fussing with separate pans or timers.
- Crispy-Creamy Payoff: That golden crust on the chicken? Pure satisfaction. The garlic butter sauce ties it all together—savory, slightly tangy, and just salty enough to make you reach for seconds.
- Meal Prep Hero: Between us, this is my go-to for busy mornings. Cook a big batch on Sunday, and you’ve got lunch or dinner covered all week. The potatoes stay tender, the chicken stays juicy, and it reheats like a dream.
- Budget-Friendly Feast: Fresh veggies and chicken breasts stretch across multiple meals without breaking the bank. Honestly, I’ve fed four people for under $15 with this—plus, the leftovers taste just as good cold the next day.
Step-by-step instructions for Applebee's sizzling chicken skillet
Here's how to recreate that iconic restaurant skillet with golden chicken and melty cheese.
🍳 Step 1: Sear the Chicken Until Golden
Cut the 1.5 lb boneless, skinless chicken breasts into 1-inch strips as directed in the ingredients. In a large cast-iron skillet, melt 3 tbsp butter over medium-high heat until foaming. Add the chicken strips in a single layer, letting them sear undisturbed for 3-4 minutes until golden brown on one side.
Here's the thing—don't crowd the pan. If you have to work in batches, that's fine, but keep the heat medium-high so the chicken develops that perfect crispy crust. Once the first side is golden, flip carefully and cook another 3-4 minutes until fully cooked through. Remove the chicken and set it aside on a plate.
👨🍳 Step 2: Build the Flavor Base
In the same skillet (no need to wipe it clean—those browned bits are flavor gold), add the 1 whole yellow onion and 4 cloves garlic cloves (minced). Cook for 3-4 minutes until the onions soften and the garlic becomes fragrant. You'll know it's ready when you can smell that sweet, caramelized onion aroma filling your kitchen.
Now add the 1.5 lb baby potatoes (halved), 2 whole red bell peppers (sliced), and all the seasonings: 1.5 tsp salt, 0.5 tsp black pepper, 0.5 tsp garlic powder, and 0.5 tsp onion powder. Stir everything together and cook for 5-6 minutes until the potatoes start to soften and the peppers just begin to blister slightly.
🥘 Step 3: Create the Creamy Cheese Sauce
Lower the heat to medium and sprinkle the 0.5 cup all-purpose flour over the vegetable mixture. Stir vigorously for 1-2 minutes until the flour is completely incorporated and the mixture thickens slightly. This step is crucial—it helps thicken our sauce and create that perfect creamy texture.
Gradually add 1 cup of water (yes, it seems like a lot, but trust me) while stirring constantly to prevent lumps. Let the mixture simmer for 3-4 minutes until it thickens into a smooth sauce. Then stir in the 8 oz cream cheese and 0.5 cup sour cream until fully melted and combined. The sauce should be thick but still pourable—if it's too thick, add a splash more water.
🔥 Step 4: Combine and Melt the Cheese
Return the chicken strips to the skillet and stir gently to coat them in the creamy sauce. Sprinkle 2 cups shredded cheddar cheese evenly over the top, then cover the skillet with a lid. Let it cook for 5-7 minutes on medium-low heat until the cheese is fully melted and bubbly.
Here's where the magic happens: the residual heat from the skillet will melt the cheese perfectly, creating that gooey, stretchy texture you love. If the top starts to brown too quickly, just reduce the heat slightly. You want that beautiful golden crust on top while keeping everything underneath creamy.
⏰ Step 5: Finish and Garnish
Once the cheese is completely melted and the skillet looks bubbly all over, remove it from heat. Let it sit covered for 2-3 minutes to let everything set slightly. Then stir gently one last time to combine everything beautifully.
Garnish with the 3 whole green onions (sliced) and serve immediately while the skillet is still hot. The chicken should be crispy, the potatoes tender, and the cheese perfectly melty with every bite. Serve with crusty bread or a simple side salad to soak up all that delicious sauce!
Pro Tips For Making Applebee'S Sizzling Chicken Skillet
- CRISP THE POTATOES FIRST: I learned this the hard way—throwing raw baby potatoes into the skillet with everything else means they’ll steam instead of crisp. Parboil them for 8-10 minutes first, then let them dry completely on a towel before adding. That’s what gets you that golden, crunchy bite Applebee’s nails.
- CUT CHICKEN SMALLER THAN YOU THINK: This isn’t a fillet—chop those chicken breasts into 1-inch cubes, not 2-inch hunks. Smaller pieces cook faster, stay juicier, and soak up the sauce better. I used to eyeball it and end up with dry edges. Now I measure with a knife.
- DON’T OVERFILL THE SKILLET: Crowding the pan turns your sizzle into a sad simmer. Use half the chicken and veggies you’d normally grab—you’ll cook in batches, but the result is way better. Trust me, your future self will thank you when the chicken isn’t swimming in its own juices.
- SAUTÉ ONIONS UNTIL SOFT, NOT BROWN: Skip the caramelization—you want the onions to melt into the sauce, not turn into candy. Cook them low and slow for 5-6 minutes until just translucent. After burning three batches trying to rush this, I finally got it right. (Yes, even if you’re impatient like me.)
Storing and reheating your leftovers
Refrigerator Storage
Let your skillet cool completely before storing—this prevents condensation that makes the cheese soggy. Transfer to an airtight container (I love Glasslock containers) and refrigerate for up to 4 days.
The flavors actually deepen overnight, making leftovers taste even better the next day. Just reheat gently to avoid drying out the chicken. 🥶
Freezer-Friendly Tips
This dish freezes beautifully for up to 3 months if stored properly. Portion into single-serving containers (like Rubbermaid EasyFind) before freezing—this makes reheating a breeze. Leave ½-inch headspace to prevent expansion cracks, and wrap tightly with plastic wrap before sealing. Thaw overnight in the fridge for best results. ❄️
Stovetop Reheating
My favorite method is stovetop—it preserves the crispy chicken texture. Cover the skillet with a lid and heat over medium-low for 10-12 minutes, stirring occasionally. Add 2-3 tablespoons of water or milk if the sauce looks too thick.
The residual heat will remelt the cheese perfectly while keeping the chicken tender. 🔥
Microwave Method
For quick reheating, transfer to a microwave-safe dish and cover loosely with a damp paper towel. Heat on 50% power in 1-minute intervals, stirring between each, until reaching 165°F internal temperature. The damp towel prevents drying, and the lower power keeps the cheese from getting rubbery. 💫
Oven Refresh
If you want that crispy-topped restaurant feel, preheat the oven to 350°F and transfer the skillet to a baking dish. Cover with foil and bake for 10 minutes, then uncover and broil for 1-2 minutes until the cheese bubbles.
This method works best for larger portions that need a texture boost. ✨
Garnish Before Serving
Always add fresh green onions or a dollop of sour cream right before serving—this keeps everything looking vibrant. The skillet reheats best when garnished after warming, so save these toppings until the very end. A sprinkle of crushed black pepper also adds a nice finishing touch. 🌿
Nutrition facts
Frequently asked questions
Can I use chicken thighs instead of breasts?
Chicken thighs work beautifully—they stay juicier and more flavorful during the long cooking time. Use 1.5 lbs bone-in, skin-on thighs instead, and reduce the cooking time slightly (about 2-3 minutes less per side) since they cook faster than breasts. The skin will crisp up perfectly, adding extra texture to your dish.
What's the best way to get crispy chicken skin?
Pat the chicken strips very dry with paper towels before dredging in flour—this removes moisture that prevents crispiness. Use a cast-iron skillet (it retains heat better) and keep the heat at medium-high while searing. Cook the chicken in a single layer without crowding, and resist the urge to flip too soon!
Can I make this dish ahead of time?
Yes, but with a few key adjustments. Assemble everything except the cheese, refrigerate overnight, then add the cheese and melt it fresh before serving. This prevents soggy potatoes. For a fully assembled skillet, freeze it (without garnishes) for up to 3 months, then reheat using the stovetop method to restore crispiness.
Why did my cheese sauce get lumpy?
Lumpy sauce usually means the flour wasn't fully incorporated or the cream cheese melted too quickly. Always stir vigorously when adding flour to the vegetables, and gradually whisk in cold water. For the cream cheese, reduce heat to medium-low and stir constantly until fully melted—never let it sit in the hot pan unattended.
What can I substitute if I don't have cream cheese?
Use 1 cup of sour cream instead, but add it gradually while stirring to prevent curdling. For extra richness, mix ½ cup sour cream + ½ cup mayonnaise. The texture will be slightly different but still delicious. If you're avoiding dairy, a blend of ½ cup Greek yogurt + ½ cup milk works in a pinch.