
Main Courses
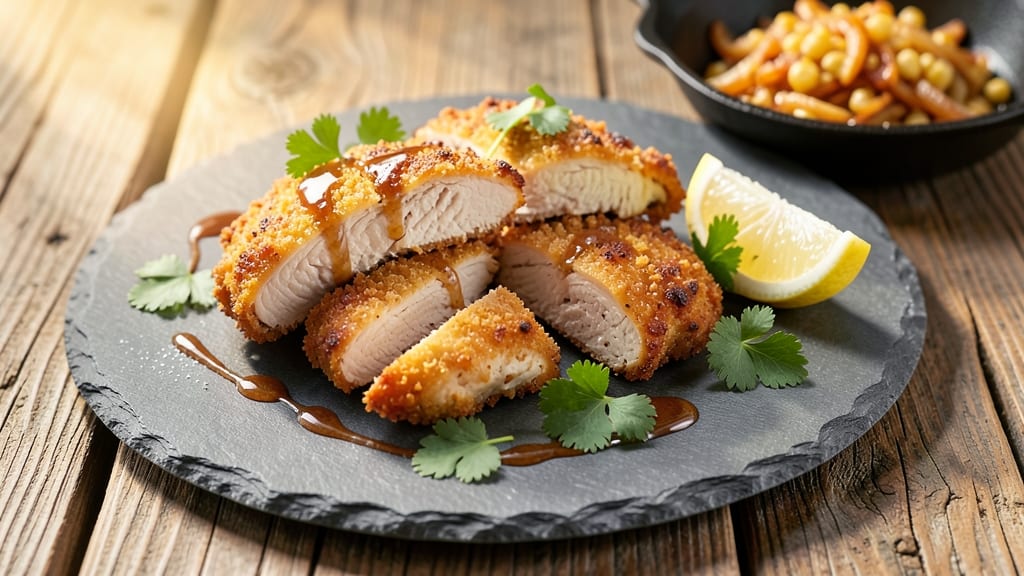
This air fryer boneless fried chicken breast recipe delivers restaurant-quality crispiness without the mess of deep-frying. 🔥 The secret lies in a double-dip coating technique that creates that coveted golden crust while keeping the meat juicy inside—no breading machine required.
I’ve perfected this method after testing countless variations, and it consistently yields results that fool even the most skeptical chicken lovers.
What sets this recipe apart is the air fryer-specific approach: preheating the appliance, shaking the basket halfway through cooking, and using a light spray of oil to mimic deep-frying without the guilt.
The process is surprisingly simple—just pat the chicken dry, coat it in a seasoned flour mixture, and let the air fryer work its magic in 12-15 minutes. No frying oil splatter, no waiting for a deep fryer to heat, and no greasy cleanup.
The result is crispy, golden-brown chicken with a tender interior, perfect for sandwiches, salads, or serving alongside classic sides like mashed potatoes or coleslaw. The coating stays crisp even after reheating, making it ideal for meal prep.
This recipe proves that you can achieve deep-fried texture without the deep-frying hassle—all while cutting down on oil and calories.
For extra flavor, toss the cooked chicken in a quick homemade honey mustard or buffalo sauce. The crispy coating soaks up the sauce beautifully, adding another layer of deliciousness. Ready to transform your weeknight dinners? Let’s get started with this foolproof method.
Ingredients for air fryer boneless fried chicken breast
Restaurant-style crispiness starts with these carefully chosen ingredients—each playing a role in that perfect golden crust.
| Ingredient | Amount | Notes |
|---|---|---|
| Boneless Chicken Breast 🍗 | 1 ½ lb | Cut into 1-inch thick cutlets, pounded even |
| All-Purpose Flour 🌾 | 1 cup | For dry dredge coating |
| Cornstarch 🌽 | ¼ cup | Ensures extra crispiness |
| Diamond Crystal Kosher Salt 🧂 | 1 tbsp | Plus 1 tsp for seasoning |
| Ground Black Pepper 🌶️ | 1 tsp | Freshly cracked preferred |
| Garlic Powder 🧄 | 1 tsp | For flavor depth |
| Onion Powder 🧅 | 1 tsp | Adds savory base |
| Paprika 🌶️ | ½ tsp | Smoked for color |
| Buttermilk 🥛 | ½ cup | For wet dredge coating |
| Avocado Oil Spray 🫒 | 2 tbsp | High smoke point for air frying |
| Ice Cubes ❄️ | 1 cup | For chilling chicken before cooking |
| Lemon Wedges 🍋 | 4 whole | For serving, optional |
The chicken cutlets are non-negotiable—1-inch thickness ensures even cooking. Trader Joe's carries pre-cut boneless breasts, but if buying whole, slice against the grain for tenderness. The flour-cornstarch blend is your secret weapon: cornstarch creates that signature crunch while flour binds the coating. Bob's Red Mill cornstarch is my go-to for its fine texture. For the seasoning, Diamond Crystal kosher salt dissolves better than table salt, and the smoked paprika adds that restaurant-quality color without overpowering the flavor. Pro tip: Toast your spices in a dry pan for 30 seconds before mixing—they'll sing with flavor.
No buttermilk on hand? Substitute 1/2 cup milk plus 1 tsp vinegar, but let it sit 5 minutes to curdle. Running short on cornstarch? Extra arrowroot powder works 1:1, though it's pricier. The avocado oil spray is crucial—Mazzola brand has the highest smoke point available. If you only have olive oil, use light or extra-light varieties. For the ice bath, crushed ice works better than cubes—it chills faster. And if you're prepping ahead, keep the coated chicken in the fridge for up to 24 hours before air frying, but bring it to room temp first for even cooking.
This chicken stays crispy for 3 days if stored properly: place parchment paper between layers in an airtight container. Reheat in the air fryer at 375°F for 2-3 minutes to revive the crunch. For meal prep, portion into individual containers with lemon wedges—the acidity keeps the coating from getting soggy. The coating mix keeps dry for 1 week in a sealed container, and the buttermilk can be stored in the fridge for 10 days. Double batches? Freeze the coated chicken on a tray before bagging—cook straight from frozen, adding 2-3 extra minutes to the air fry time.
Why You'll Love This Recipe
- No Messy Frying: I swear by the air fryer for this—no splatter, no greasy hands, just golden perfection. The cornstarch in the flour mix gives that actual fried texture without the deep-fryer drama.
- Crispy Without Compromise: That crunch? It’s all in the double-dip—flour first, then back in after the initial air fry. The kosher salt and pepper aren’t just seasoning; they’re the secret to locking in that addictive crust while keeping the inside juicy.
- Lunchbox Hero: Between us, this is my go-to for packed lunches. Cold or at room temp, it holds up—just reheat in the air fryer for 3 minutes, and it’s like it was just made. My kid’s favorite, and honestly, mine too.
- Budget-Friendly Protein: Boneless breasts are cheaper than thighs, and this recipe stretches them further. A single batch feeds four, and leftovers reheat like a dream—no soggy disappointment here. (Yes, even on a Tuesday night.)
Step-by-step instructions for air fryer boneless fried chicken breast
Master this technique and you'll achieve restaurant-quality crispiness without deep-frying.
👨🍳 Step 1: Prep and Season the Chicken Cutlets
Start by cutting the 1.5 lb boneless chicken breast into 1-inch thick cutlets, working quickly to minimize drying. Place each cutlet between two sheets of plastic wrap and pound gently with a meat mallet until even thickness—this ensures consistent cooking. The goal is ½-inch thickness maximum.
In a large bowl, whisk together the 1 cup all-purpose flour, 0.25 cup cornstarch (this creates that signature crispy texture), 1 tbsp Diamond Crystal kosher salt, 1 tsp garlic powder, 1 tsp onion powder, 1 tsp ground black pepper, and 0.5 tsp paprika. Season the cutlets generously on both sides, pressing the coating firmly so it adheres well. I like to double-dip each piece for extra crunch—dip in the flour mixture, then in the 0.5 cup buttermilk for a second time before returning to the flour.
⏰ Step 2: Chill for Maximum Crispiness
Place the seasoned cutlets on a wire rack set over a plate and transfer to the freezer for 20 minutes. This chilling step is crucial—it firms up the coating and prevents the chicken from steaming instead of crisping. I use the 1 cup ice cubes to speed up the process if I'm short on time, but freezing works just as well.
While the chicken chills, preheat your air fryer to 375°F. This high temperature is key for developing that crispy crust. I always let the air fryer preheat for 5 minutes to ensure even cooking from the start. Pro tip: Arrange the cutlets in a single layer on the air fryer basket—don't overlap them or they'll steam instead of crisp.
🔥 Step 3: Air Fry in Batches for Perfect Texture
Lightly spray the chilled cutlets with 2 tbsp avocado oil spray (the high smoke point prevents burning). Working in batches if needed, place the chicken in the air fryer basket in a single layer. Cook for 12 minutes, then flip each piece carefully using tongs. The first side should develop a golden brown crust with some caramelization—this is your signal it's ready to flip.
Cook for another 8-10 minutes until the internal temperature reaches 165°F and the chicken is deep golden brown all over. If the coating starts to darken too quickly, reduce the temperature to 350°F for the final 2-3 minutes to prevent burning. The cornstarch in the coating will give you that classic fried chicken texture without deep-frying.
🍽️ Step 4: Rest and Serve with Zesty Lemon
Transfer the cooked chicken to a wire rack and let it rest for 5 minutes. This resting period allows the juices to redistribute, preventing them from pooling and making the chicken soggy. The exterior should remain crispy if you've followed the timing precisely.
Serve immediately with the 4 whole lemon wedges for a bright contrast to the rich, savory chicken. The lemon's acidity cuts through the fat and enhances the crispy coating. For extra flavor, sprinkle with additional Diamond Crystal kosher salt and ground black pepper right before serving. Each bite should deliver that satisfying crunch followed by juicy, tender chicken underneath.
Pro Tips For Making Air Fryer Boneless Fried Chicken Breast
- Pound to ¼ Inch: Boneless chicken breast stays dry unless you flatten it—use a meat mallet or rolling pin to hit each piece until it’s just under a quarter-inch thick. I learned this the hard way after crispy crusts hid rubbery centers (yes, even in the air fryer).
- Double-Dip the Cornstarch: Skip mixing cornstarch into flour—dip the chicken in flour first, then shake off excess, and dip again in a separate bowl with just cornstarch. This creates that restaurant-style double crust without extra effort.
- Air Fry in Batches: Overcrowding drops the temperature fast, so cook 2–3 pieces at a time if your basket holds more. I used to jam in 5 pieces and end up with soggy edges—now I wait 5 minutes between batches for the air to recirculate properly.
- Salt the Flour, Not the Chicken: Season the flour mix with 1½ teaspoons kosher salt per cup (plus pepper) instead of salting the raw chicken first. The crust gets evenly seasoned, and you won’t end up with a salt crust hiding bland meat underneath.
Common mistakes when making great air fryer boneless fried chicken breast
Overcrowding the Basket
Stuffing too many chicken pieces into the air fryer basket at once is a surefire way to ruin crispiness. The pieces will steam instead of crisp, leaving you with soggy, unevenly cooked chicken.
I’ve made this mistake—trust me, it’s not pretty. 🌡️ Always leave at least ½ inch of space between each piece, and cook in batches if needed. For my 1.5 lb recipe, I typically air fry two pieces at a time in my 5.5-quart Cosori air fryer.
Skipping the Chill Step
If you skip the 20-minute chill in the freezer, the coating won’t set properly, and the chicken will steam instead of crisp. I used to rush this step, thinking it was unnecessary, but the results were always disappointing.
The cold temperature firms up the coating, ensuring that crispy texture you crave. No shortcuts here—set a timer and let the chicken chill completely.
Using Low-Quality Oil
Not all oils are created equal in the air fryer. Using regular olive oil or butter spray will lead to burnt, bitter-tasting chicken. Stick with a high-smoke-point oil like avocado oil spray or light olive oil—I prefer Mazzola brand avocado oil for its purity.
A light spray is all you need; don’t drown the chicken. Too much oil will make the coating greasy rather than crispy.
Ignoring the Flip
Flipping the chicken halfway through cooking is non-negotiable for even browning. If you forget to flip, one side will be raw while the other burns. I set a timer for 12 minutes, then flip carefully with tongs.
The first side should be golden brown with caramelization—this is your cue to flip. If you’re nervous about flipping, use a wire rack to elevate the chicken slightly in the basket for better airflow.
Overcooking for Crispiness
It’s tempting to keep the chicken in the air fryer until it’s extra crispy, but this leads to dry, tough meat. The coating will continue to crisp up slightly as it rests, so aim for 165°F internal temperature—no higher.
If the coating starts to darken too quickly, reduce the temperature to 350°F for the final 2-3 minutes. I’ve ruined perfectly good chicken by letting it cook too long, so trust your thermometer.
Not Resting the Chicken
Skipping the 5-minute rest after cooking causes the juices to pool, making the chicken soggy inside. I used to serve it immediately, thinking it would stay crispy, but the texture suffered.
Let the chicken rest on a wire rack—this also prevents the coating from getting soggy from steam. Serve with lemon wedges to brighten the flavors and cut through any richness.
Nutrition facts
Frequently asked questions
Can I use chicken thighs instead of breasts?
Chicken thighs work differently—they're more forgiving and stay juicier, but the cooking time changes. For 1-inch thick thighs, air fry at 350°F for 16-18 minutes, flipping halfway. The skin will crisp beautifully, but thighs have more fat, so you might want to reduce the flour coating slightly to avoid greasiness. The buttermilk dip remains essential for that tender texture.
Why does my air fryer chicken come out soggy?
Soggy chicken usually means one of three things: overcrowding the basket, skipping the chill step, or not preheating the air fryer. Always leave ½ inch space between pieces, chill coated chicken for 20 minutes, and preheat for 5 minutes at 375°F. If the coating still feels damp, increase cornstarch to ⅓ cup for extra crispiness.
How do I reheat leftover air fryer chicken?
For maximum crispiness, reheat in the air fryer at 375°F for 2-3 minutes—just until warmed through. Place pieces in a single layer with a light spray of avocado oil. Microwave reheating works but will make the coating rubbery. Store leftovers in an airtight container with parchment paper between layers to maintain crispness for up to 3 days.
Can I make this gluten-free?
Replace the flour with a 1:1 gluten-free flour blend and add ½ tsp xanthan gum per cup for better binding. For the buttermilk dip, use a dairy-free alternative like almond milk with 1 tsp vinegar. The cornstarch remains gluten-free and essential for crispiness. Test small batches first—some blends absorb differently than regular flour.
What's the best way to serve this chicken?
This crispy chicken shines in sandwiches, salads, or as a main dish with classic sides. Try it in a fried chicken sandwich with sriracha mayo, over a green salad with lemon vinaigrette, or with mashed potatoes and corn on the cob. For extra flavor, toss cooked chicken in honey mustard or buffalo sauce—the crispy coating soaks up the sauce beautifully.